Recently, an AI was fed the world literature on AAA repair and asked about guidelines and superiority of open versus endo repair. It concluded that the past twenty year, endografting has only benefitted the physicians and the device companies (this was present at VEITH). I recommend open to patients likely to benefit from it. I recommend EVAR same way. They are not equivalent especially when patients end up getting insurance denials. I hope it isn’t too late to turn this boat around and train surgeons on open techniques that seem to have been abandoned in many parts of the world.
The patient is a gentleman from out of state who had called about problems he was having with walking and with leg ulcers that wouldn’t heal. He is in his seventies and has a pacemaker for an arrhythmia for which he was on Xarelto. He also had type II diabetes. He had bilateral lower extremity deep venous thromboses 6 years prior requiring IVC filter placement. The filter occluded, and it resulted in sudden sharp and debilitating pain in both legs with walking short distances -some days only 50 paces.He described it as an unbearable pain in calves and thighs that felt like his legs were going to burst. He also had ulcers on his legs that would heal with ministration but soon recur. This was all despite being quite active, with regular workouts, and being fit. He was compliant with compression. He sent a CT scan done last year (below).
Right iliocaval centerline projection
It showed an Optease retrievable vena cava filter that was occluded and the iliac systems bilaterally (right above and left below) were chronically occluded with patent vena cava above and femoral confluences bilaterally below.
Left iliocaval system showing chronic occlusion on centerline projection
He had no hypercoagulability nor ongoing recent DVT’s. I thought there was a good chance that we would be able to recanalize the occluded iliocaval segment and he flew in for a consultation, and he was pencilled into the schedule ahead of his visit.
Examination revealed a fit and trim man in his 70’s in no apparent distress. He had bilateral leg edema that was moderate with small superficial and tender ulcers of the right posterior distal calf. Pulses were normal. He was taken to our hybrid suite and venography from femoral vein access in the proximal thigh in the supine position revealed his right and left iliac venous systems to be occluded (below figures).
Right injection from femoral sheath showing occluded iliac vein with collaterals
Left injection
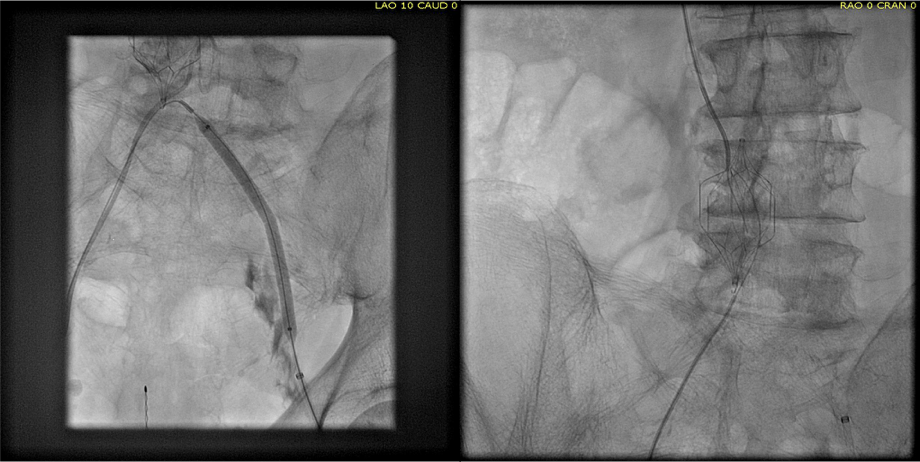
Wire access into the iliac systems was performed with Glidewire and Glidecatheter periodic venography to confirm that I had not exited the vein. Unlike the arterial system, extravasation from being extravenous does not have the consequence of bleeding, hematoma development, and pseudoaneurysm formation because of the low pressure, but it can be a long procedure and uncomfortable as well so these are done under general anesthesia.
Advancing wire and sheath into iliac vein, crossing filter resulted in extravasation of contrast
Once position confirmed to be in the iliac vein, the vein was dilated to allow for greater ease of movement. In the case of the uncrossable filter, I switched to access from above via a right internal jugular vein access.
Dilating vein (left) for greater mobility, and crossing from above (R. IJV access)
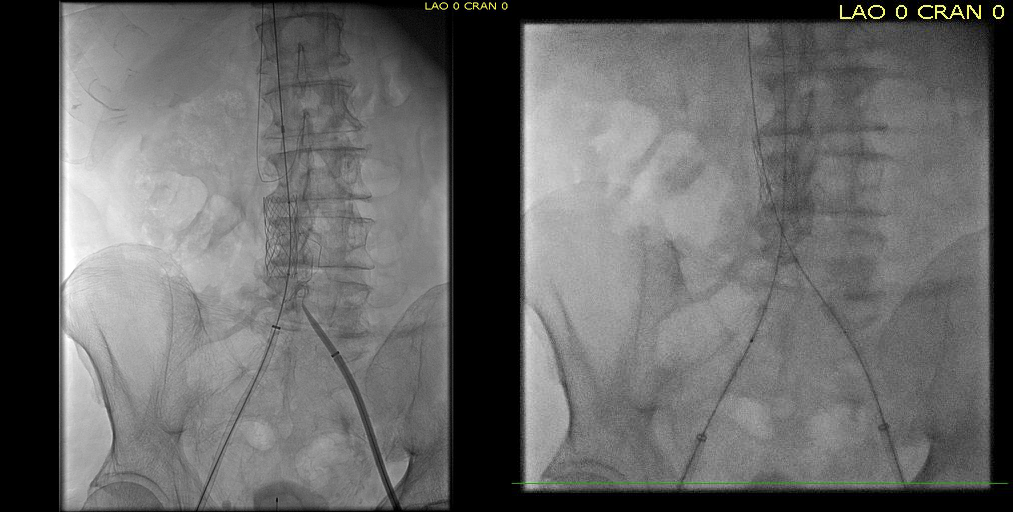
Once the wire crossed into the iliac vein from above, it was captured and brought out. While ballooning by itself is inadequate for revascularization, it greatly eases wire capture and on the right, it was done simply by driving the wire from above into the sheath. Wire capture wins access across the iliocaval and IVC filter occlusion from below.
Wire passage across IVC filter into right and left systems
Once wire access is done, ballooning across the filter is done from both sides. A large sheath is them delivered across the IVC filter. Finally, a Palmaz stent mounted on a large balloon is delivered and deployed. I chose to do this from the right access, and retracted the wire on the left -something done with some trepidation because of the great difficulty gaining this access, but with with prior balloon dilatation, reaccess is made easier. Also, plan B would be reaccess from above.
After balloon dilatation of occlusion typically to 8mm from both sides, a sheath placed and Palmaz stent deployed across filter on a large 24mm balloon
When this is accomplished, the left sided wire is reaccessed across this stent. This is the venous side analogue to gate access in EVAR (below).
Reaccess of the left iliac venous wire across Palmaz stent
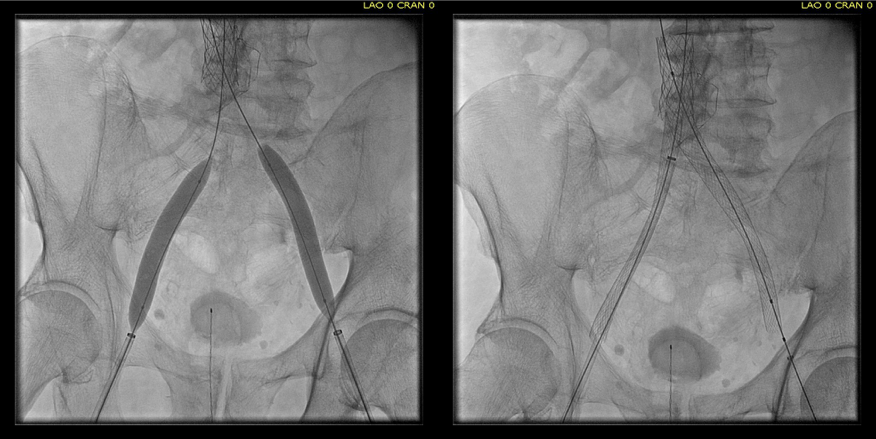
Once this is done, the iliac veins are dilated to 14mm from the IVC to the common femoral arteries. large 18mm Wall stents are deployed in a kissing fashion from the caval stent into both iliac systems and dilated to 18mm.
Predilatation of iliac venous systems with ever larger balloons, deployement of bilateral 18mm Wall Stents
After deployment, the Wall Stents are ballooned to 18mm. These stents were extended into the common femoral artery with 14mm nitinol stents.
Ballooning 18 mm Wall Stents with 18mm Atlas balloons, then extending to CFA with nitinol stents of 14mm
Completion venography suggested successful iliocaval recanalization and revascularization but these procedures are not done without a final intravascular ultrasound (IVUS).
Looks done, but needed final intervention after IVUS.
Intravascular ultrasound revealed incomplete expansion of the right common femoral stent. This was treated with another stent and ballooning with the result on the right.
Stent compression on IVUS treated with second stent
Venography alone is insufficient in determining patency. As illustrated, IVUS ensures a durable outcome.
The leg ulcer was treated with an Unna’s boot. A word about the venerable Unna’s boot –it works. The dressing dries and compresses while the Zinc Oxide prevents bacterial growth. It is interesting that the dressing is so infrequently used nowadays but not so when you consider that it isn’t reimbursed. And patients generally hate it.
This revascularization has an excellent chance at working as the patient has no hypercoagulability and had a patent common femoral confluence bilaterally. As I had mentioned in a prior post, the idea in venous revascularization is connecting confluences that serve as inflow and outflow.
This will require followup, consisting of duplex, and it is advantageous that he is anticoagulated for his arrhythmia. It is becoming more apparent that those languishing with chronic venous insufficiency and its complications need the IVC and iliac veins interrogated with a duplex. When an obstruction is found, they should be treated with these techniques as a first line therapy.
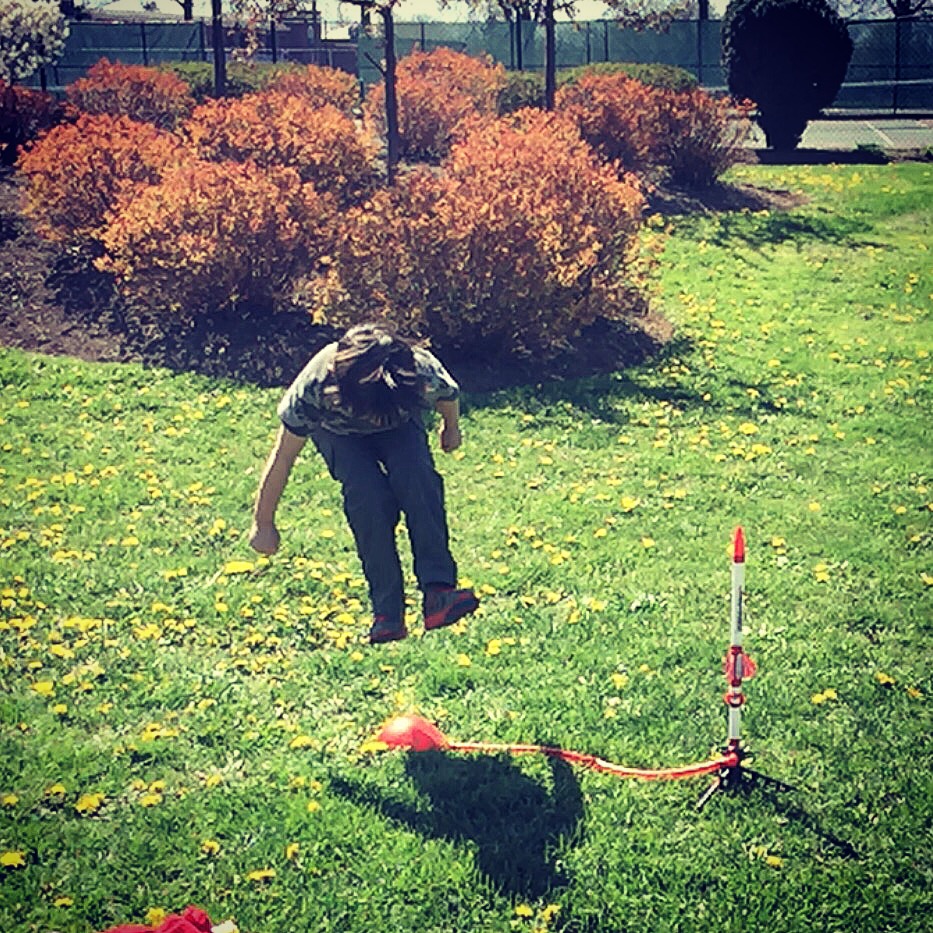
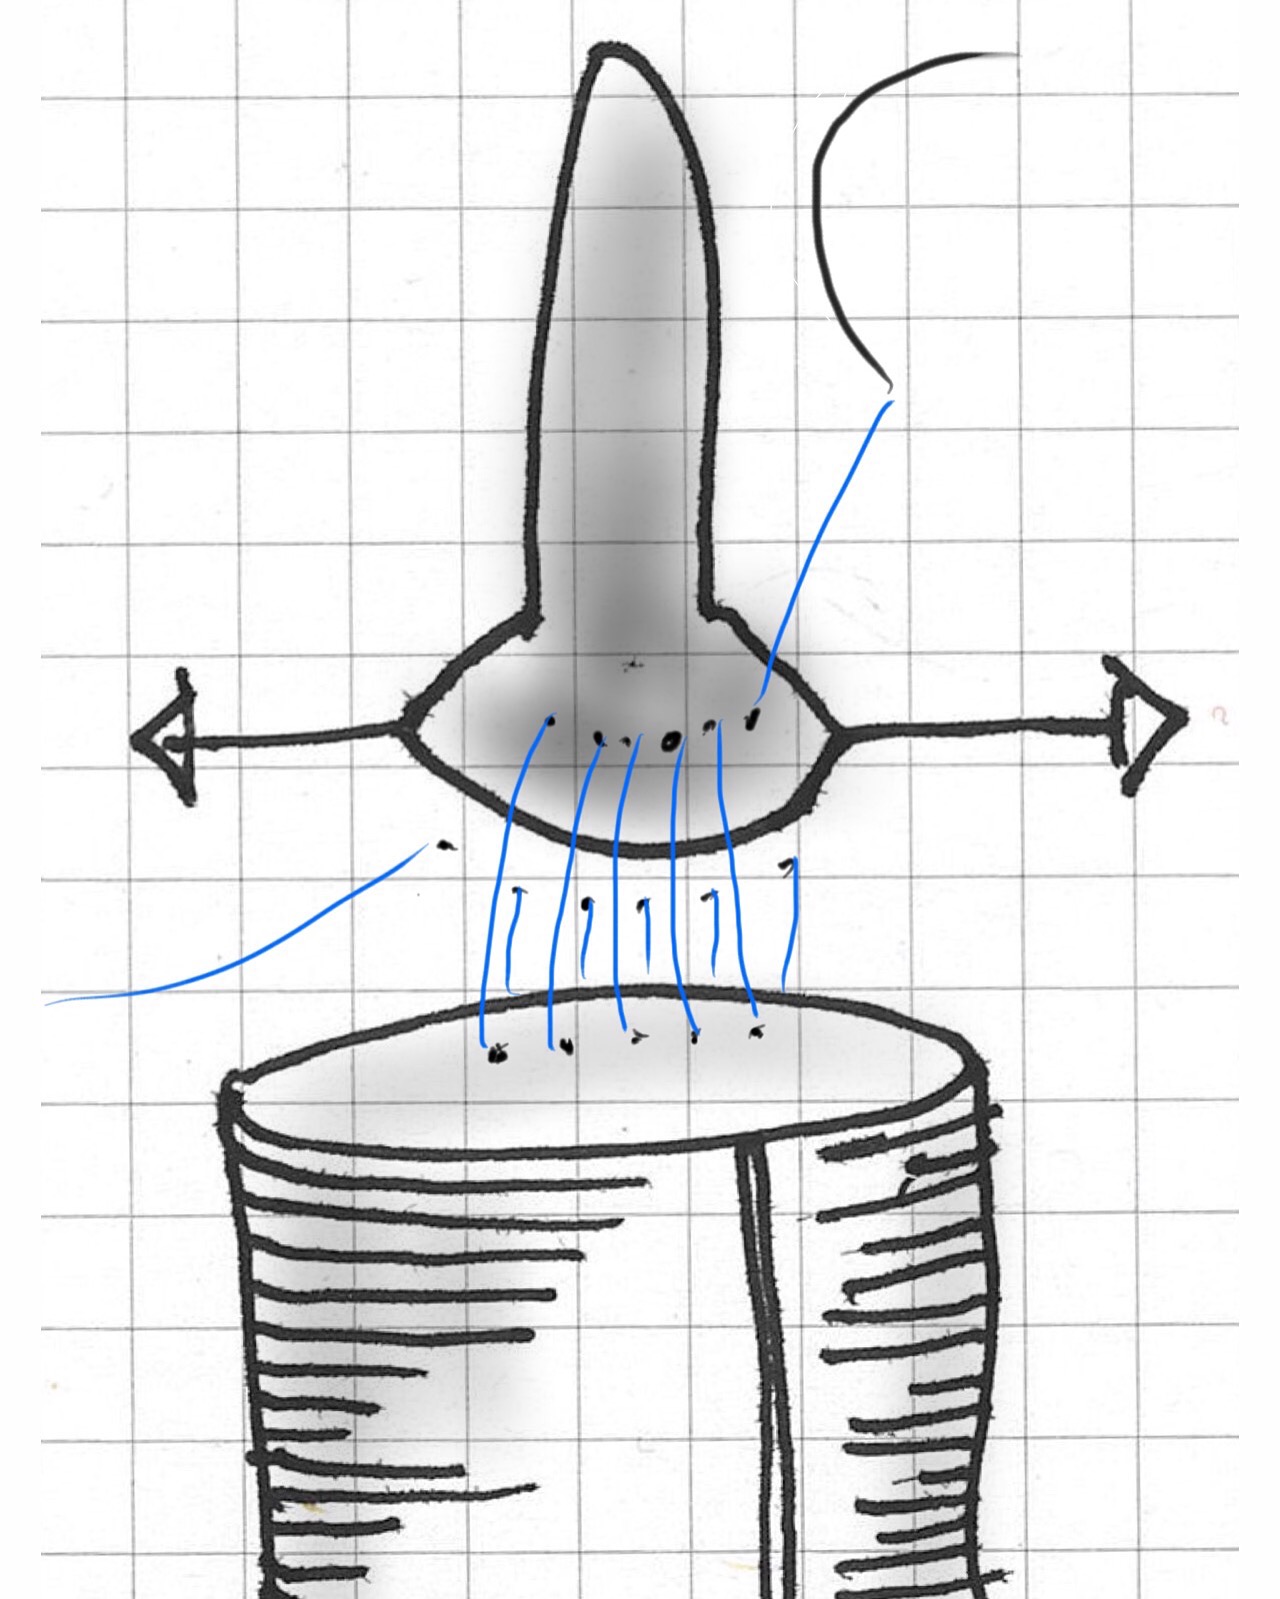
The basics of this air rocket pictured above is the projectile, attached by tube to a large bladder which when compressed by external force, ejects the projectile upwards. These are the same features of a popliteal venous aneurysm. First, the large chamber predisposes to stasis and thrombus formation. This thrombus will form on the flaccid walls which are areas where stasis occurs. During activity, it likely dislodge but catch at the outflow, obstructing it. Pressure builds up in the calf veins below, and flexing the knee and pressing the venous aneurysm ejects the thrombus towards the heart and lungs. Clot Gun.
The patient is a young woman who was an active college athlete. She had her first pulmonary embolism occur during practice several years prior to presentation. A duplex noted residual thrombus in her right popliteal vein. Over the next several years, she had two more episodes of pulmonary embolism whenever her anticoagulation was stopped. No thrombophilia was detected on workup. She was referred to the Clinic and Dr. Jerry Bartholomew in the Department of Cardiovascular Medicine noted in her records a mention of a dilated popliteal vein. On examination, she had no historical or physical examination findings to suggest a predisposition to pulmonary embolism. A duplex was ordered.
The duplex showed a 2.8cm popliteal venous aneurysm of the right leg. No acute DVT was seen but swirling rouleaux could be seen on the B-mode video. A CT venogram was ordered.
No other defect was detected. Operation was planned. Mapping showed no suitable superficial venous conduit, and venorrhaphy was planned. The patient was kept anticoagulated to the day of operation.
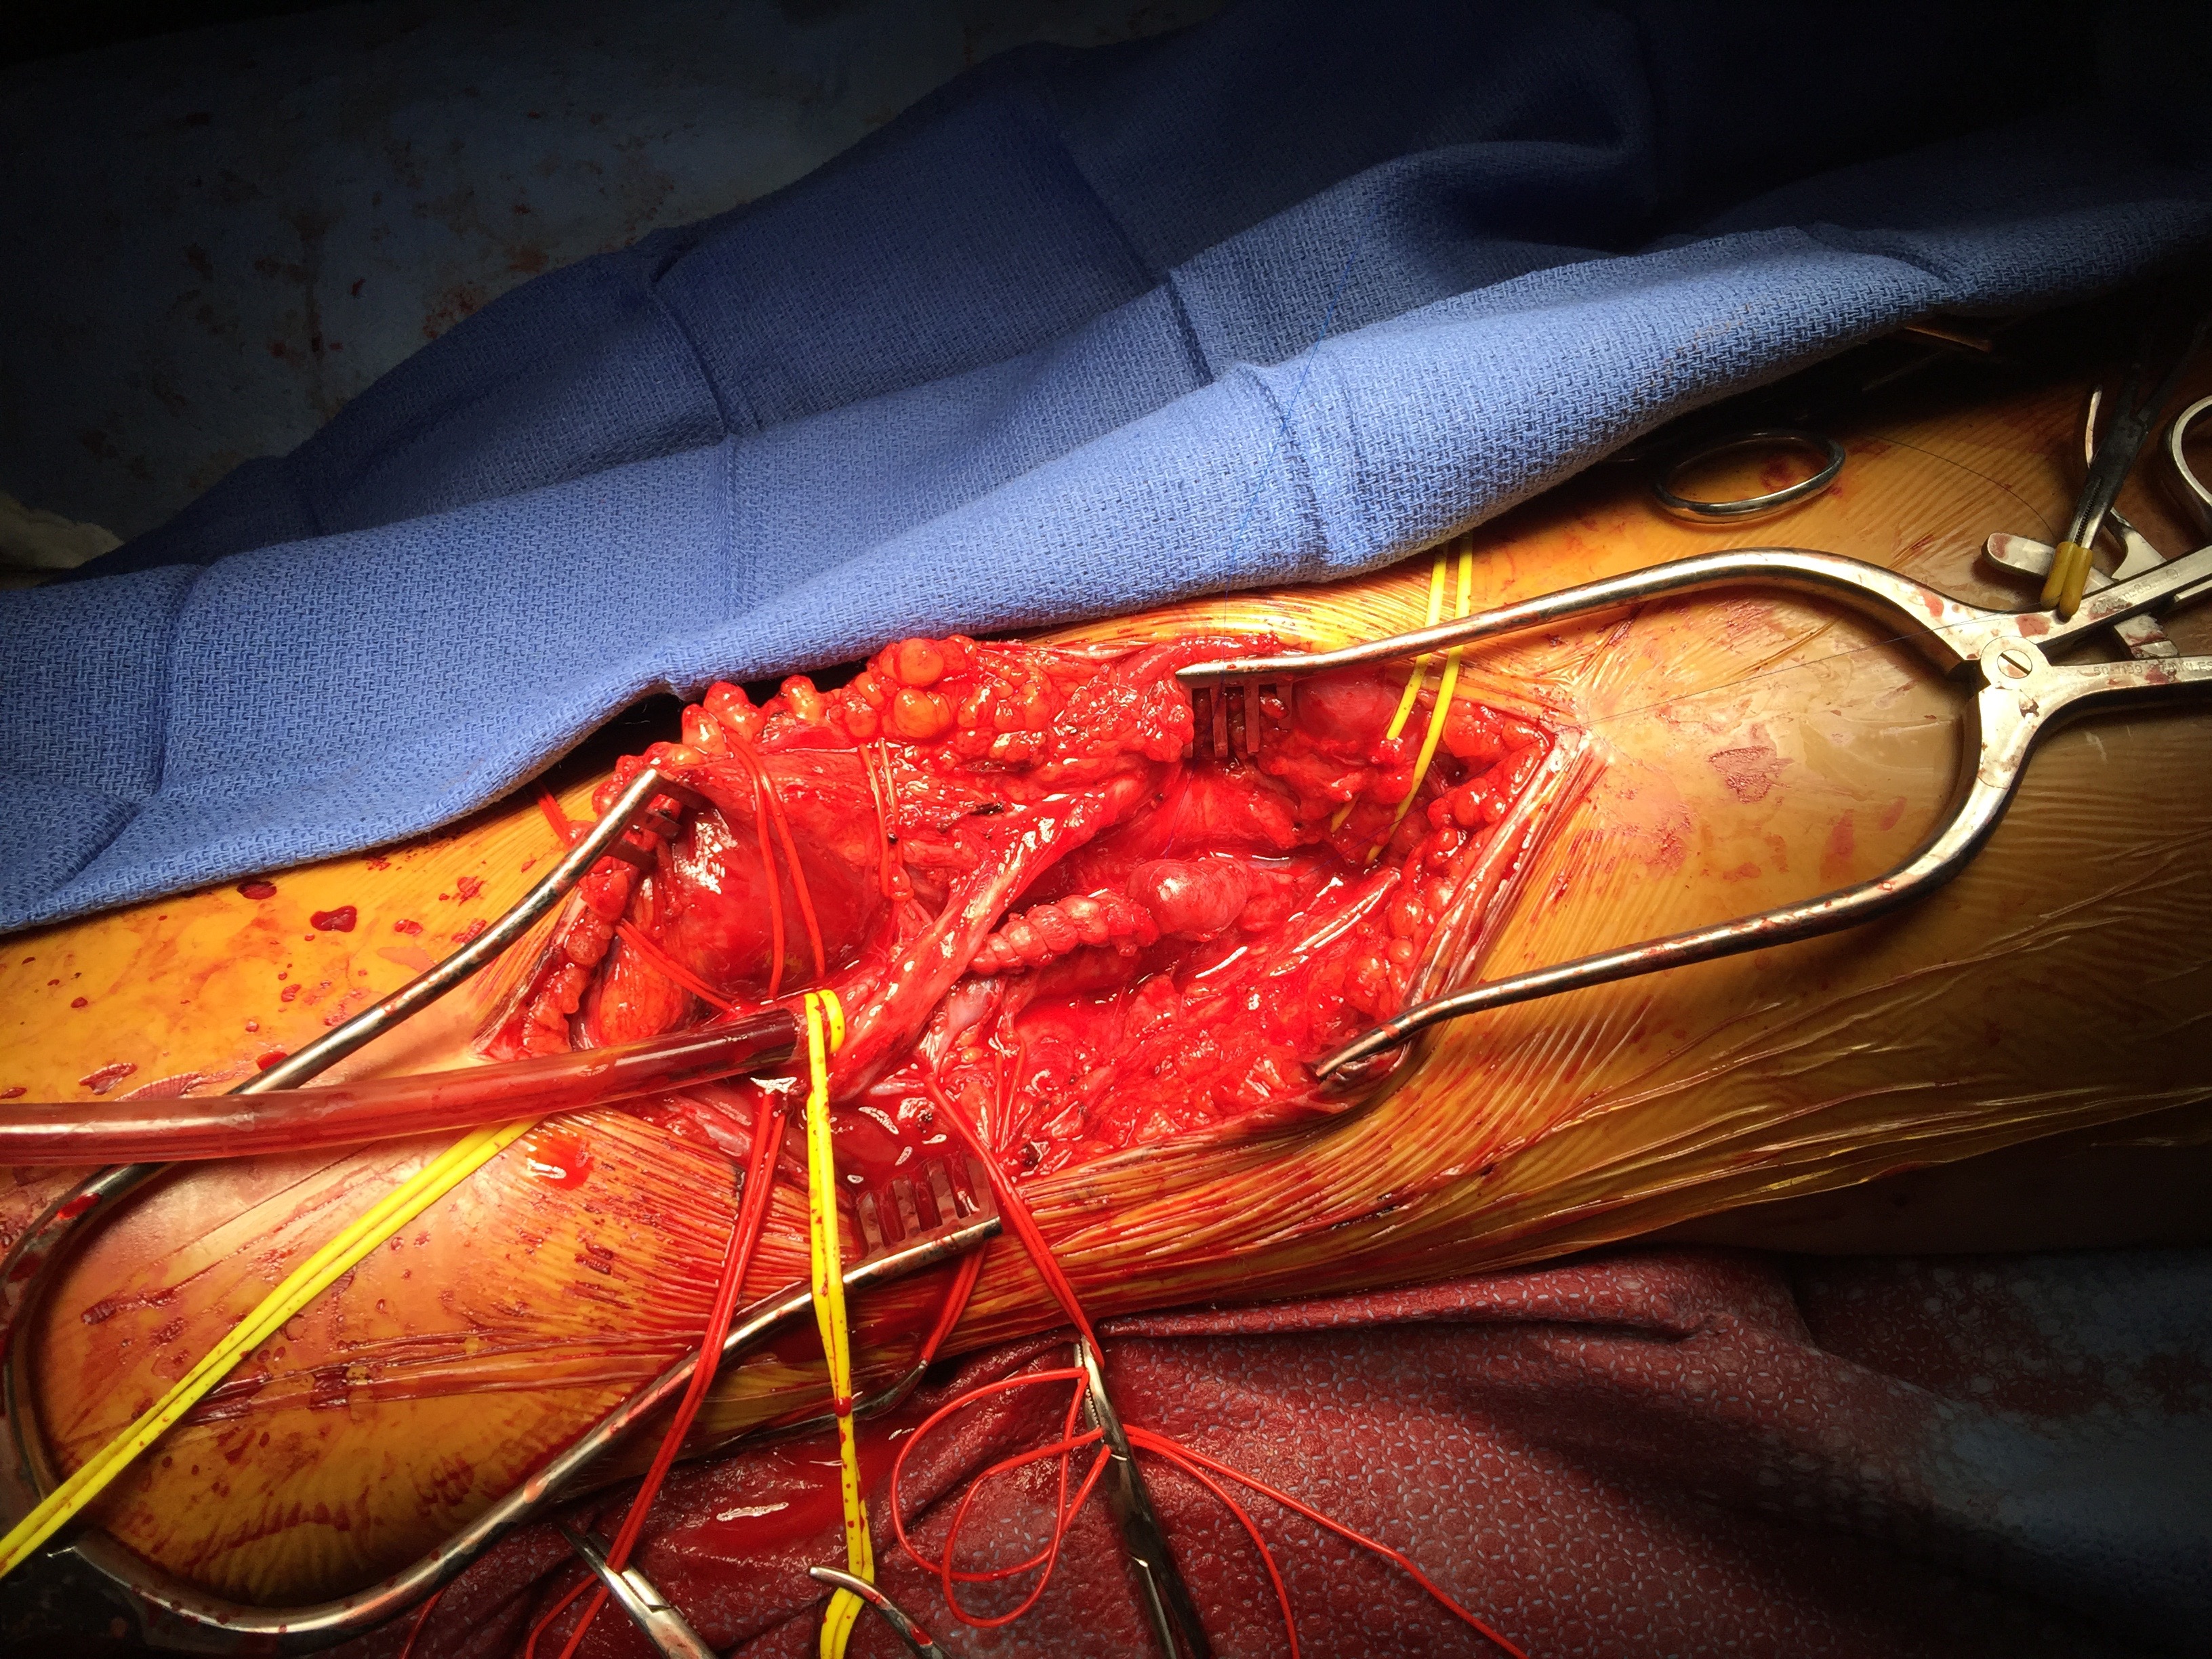
A curvilinear incision (lazy S) was made across the popliteal fossa and careful dissection revealed the aneurysm. It was soft and the vein was normal below in the calf. Above it, there was a tight fibrous band that was contricting it -a popliteal venous entrapment. I released this band. Using a 24 French Foley catheter inserted through a transverse venotomy on the popliteal vein below, the aneurysm was plicated to approximately 1cm diameter, and the catheter removed and the venotomy repaired.
The nerves were restored to their original position and the wound closed in layers. She recovered well and returned to followup about a month later. Duplex showed a patent vein and she had no symptoms of dyspnea.
The plan is to have her come off of her anticoagulation after a visit with Dr.Bartholomew. Reviewing the literature, my confreres at Mayo published their 15 year experience with popliteal venous aneurysms and found that 5 of their 8 patients presented with pulmonary embolism, and that most of their complications occurred with bypass repair while aneurysmorrhaphy fared well (reference). Because of their rarity, about 200 cases in the literature, it may be assumed that many are not found until complications occur or never found because pulmonary embolism, the most common complication, results in death. Also, it would be easy for unknowing physicians to assume that popliteal venous aneurysm falls under the umbrella of varicose vein which this is not. They should be treated when found, and in most cases, such as this, venorrhaphy is preferred.
Reference
Johnstone JK et al. Surgical treatment of popliteal venous aneurysms. Ann Vasc Surg 2015;29:1084-1089.
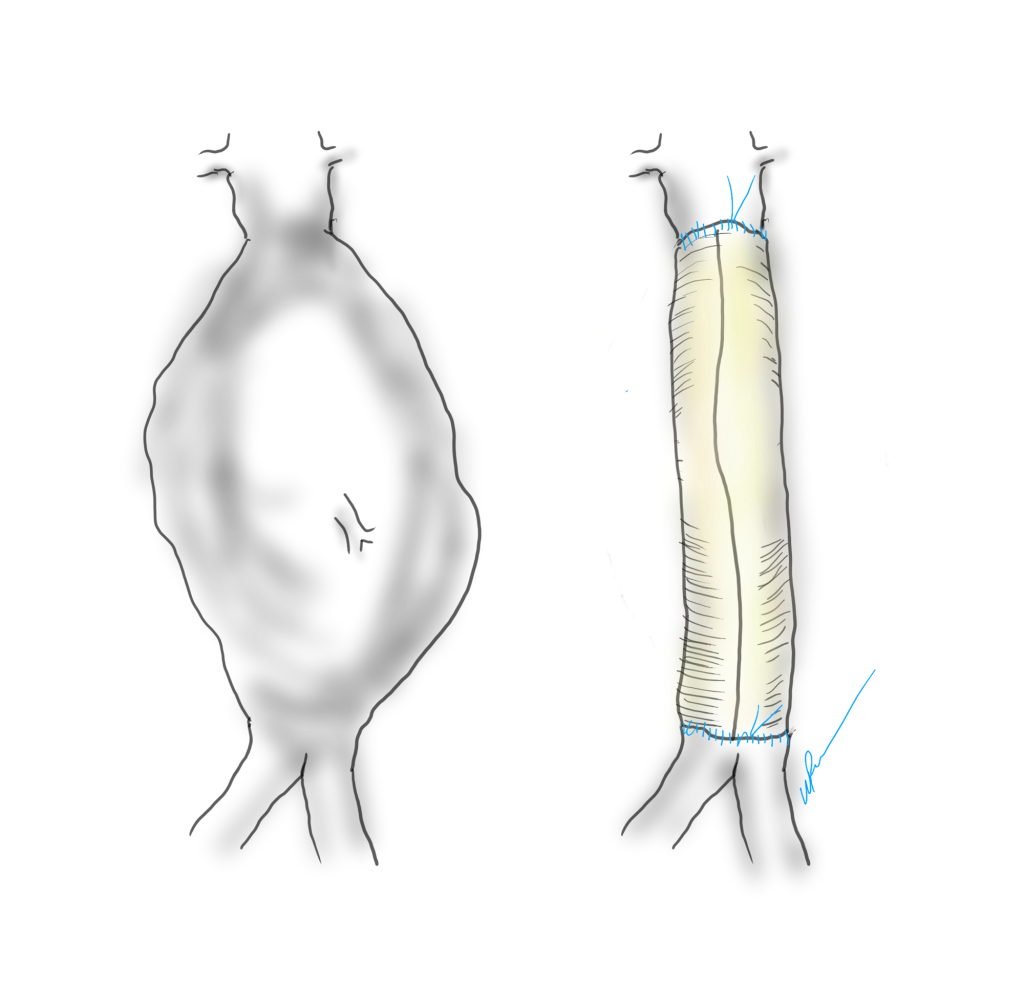
The proximal anastomosis is the most critical portion of an open aortic aneurysm repair. Several concepts are central to creating an anastomosis that doesn’t bleed at unclamping: managing narrow spaces, overcoming distortion, and using just enough tackle.
Narrow Spaces
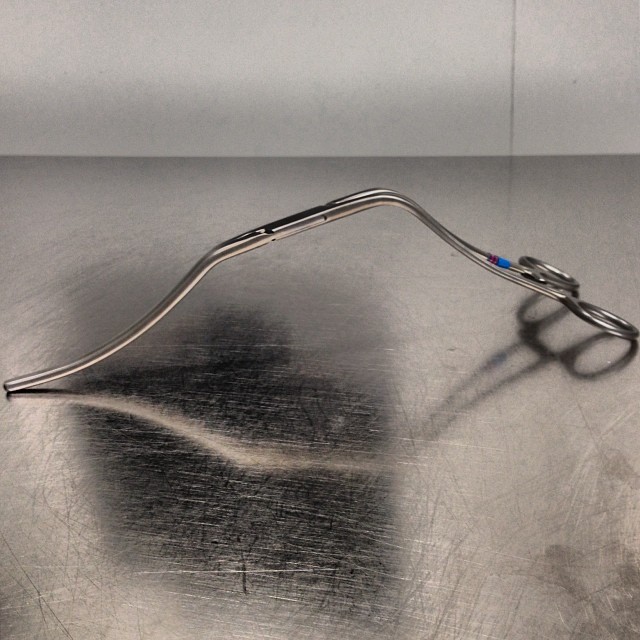
The transabdominal exposure is a narrow space. The work is done under the overhanging left renal vein, the transverse colonic mesentery, the liver, the rib cage. Extra lateral space can be made by eviscerating the bowel, but at the cost of higher rates of ileus, and doesn’t solve the first problem. The standard DeBakey aortic clamp and straight Fogarty clamps stand nearly straight up, limiting the space above the incision at the aortic neck. My goto clamp is the Cherry Supra Celiac Aortic Clamp, designed by my mentor Ken Cherry.
It hugs the contour of the mesentery and liver overhang, and the handles stay out of the way above the wound. It will also tilt up the aorta because of the weight balance. The other option is to apply a transverse clamp, which I will discuss in a later post. The transverse clamp leaves the suprarenal space free of clamp, but can be difficult if not hazardous to apply. The clamp has to be hemostatic and this can be challenging with atherosclerotic plaque -preoperative planning must include planning for safe clamp sites. A suprarenal clamp may be limited by the presence of the terminal insertions of the diaphragmatic crurae. I have recently found that dividing these crurae with a Maryland tipped Ligasure, a laparoscopic instrument I use to dissect the retroperitoneum, makes short order of what can sometimes be an awkward exposure in this tight space. Finally, endarterectomy of the neck should be done carefully to let needles pass without difficulty.
Distortion
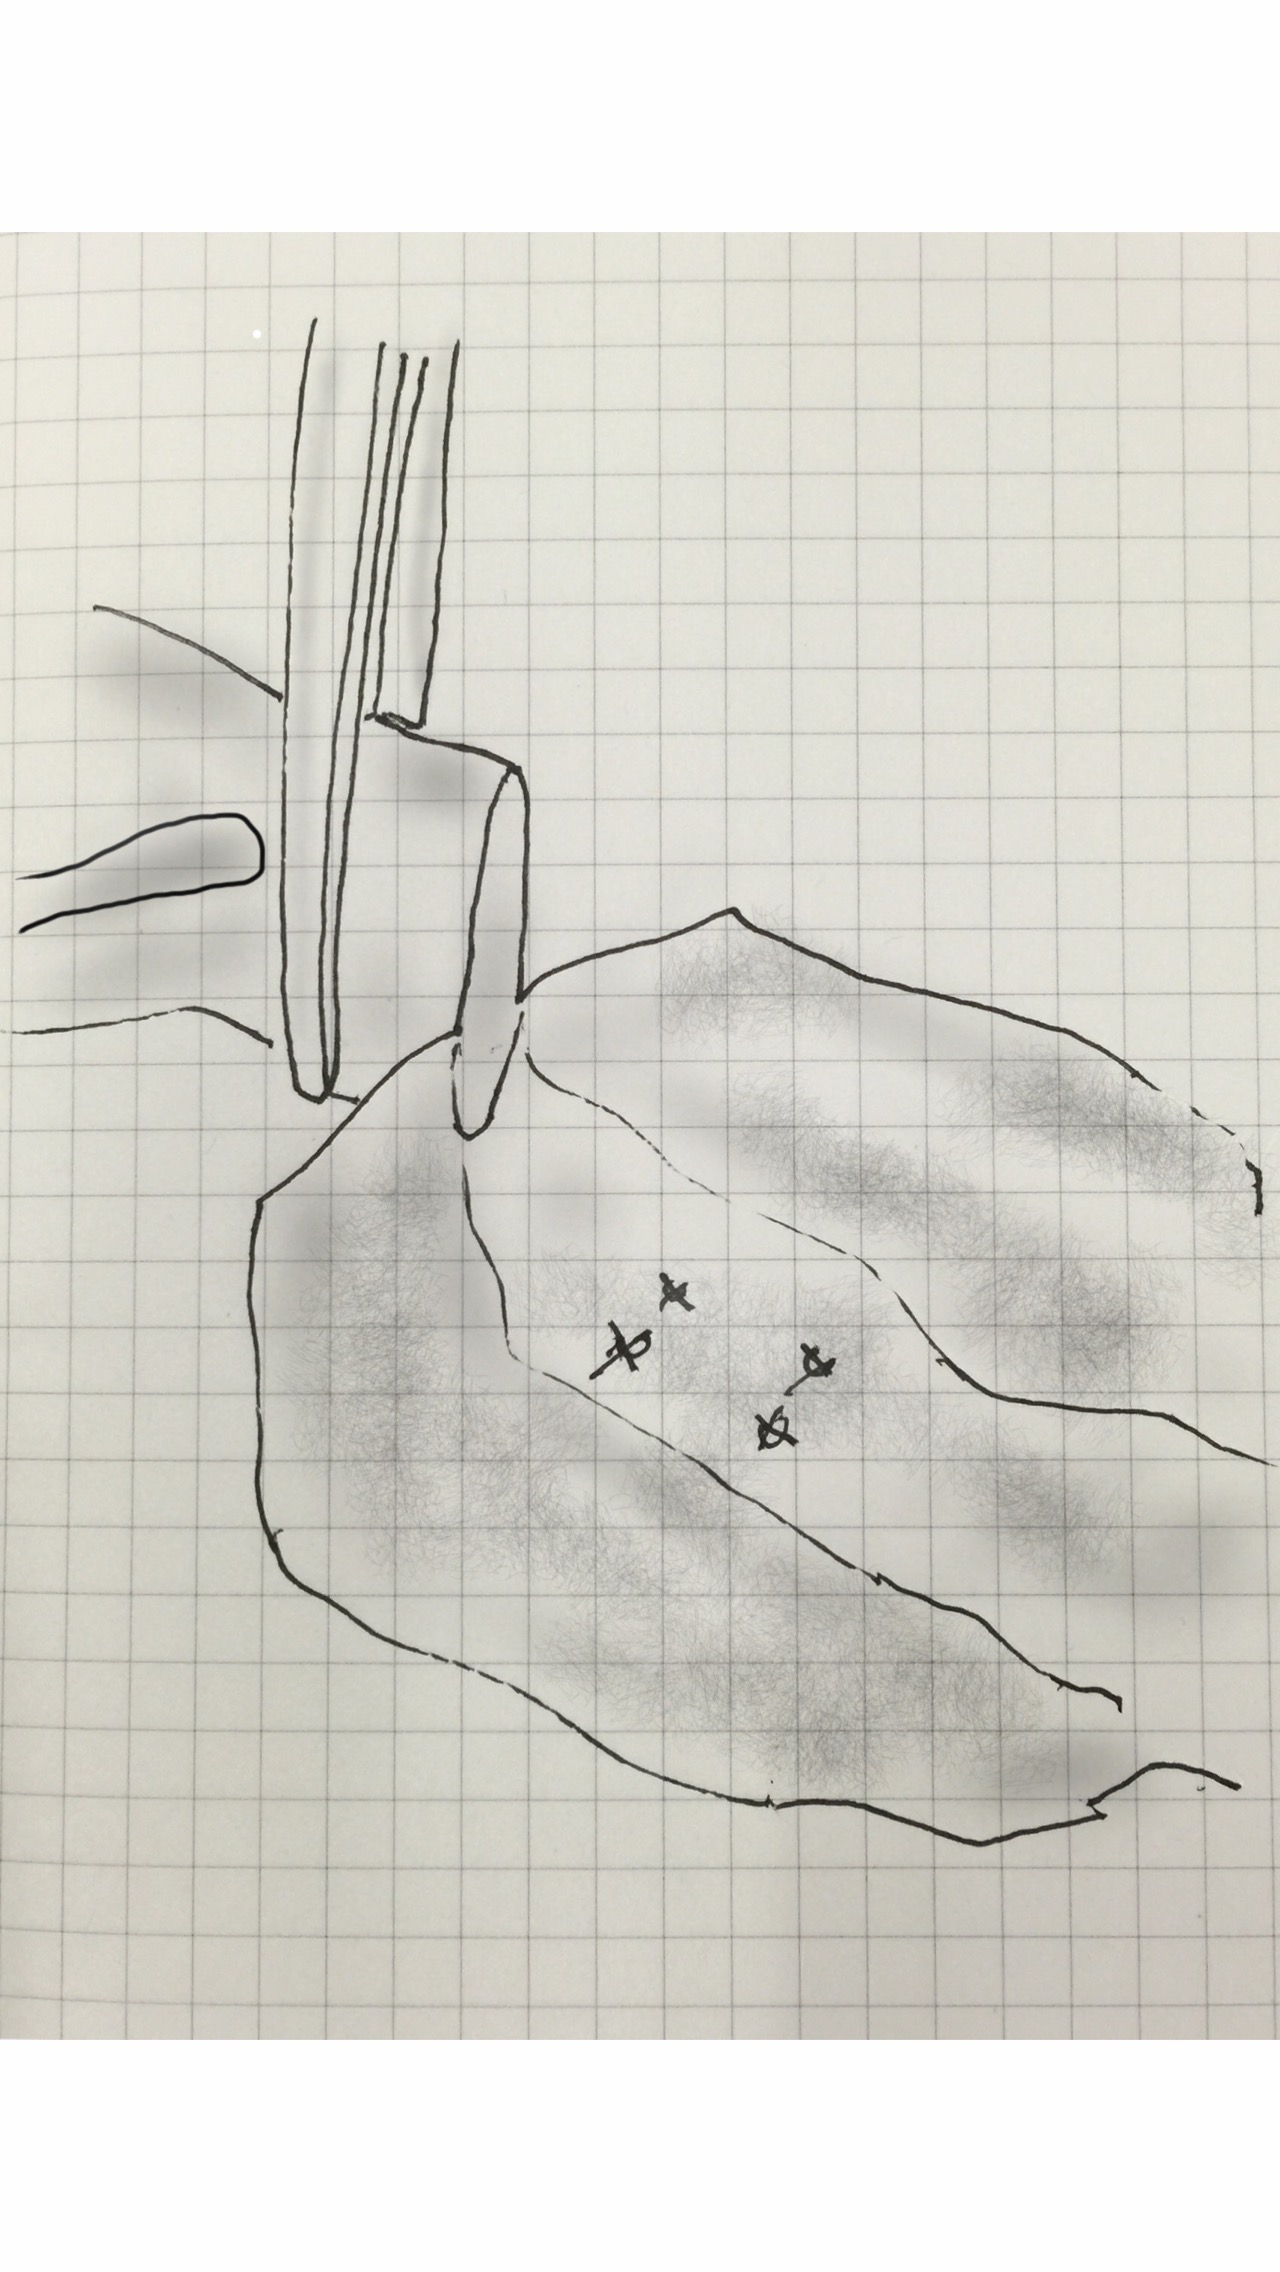
The proximal anastomosis is ideally just another end to end anastomosis -attaching a circle to a circle, but clamping narrows and distorts the circular aortic neck (top illustration). To envision this, imagine the aortic neck being a clock face:
Lets say the suture should be applied at each of the hours and half hours. You get ready to sew your first aortic neck and after endarterectomizing some plaque, you get this:
The important point is that you still have to apply the original plan of applying sutures evenly and at an appropriate frequency (about 3mm apart), to avoid gathers and gaps, especially on the posterior wall. One way is to apply outward tension with a Wheatlander retractor in the aortic sac.
The posterior wall of the aorta should be distracted to avoid distortions that create uneven gaps between passes of the needle. The bites on the aorta should be generous, on the graft, less so. As long as the gaps between the sutures is the same on both aorta and graft, you shouldn’t get leaks. The other principle to guide you is the needles should pass pointing to the center of the clock -this is challenging in the Dali clock, but if you pivot your shoulder, your suturing won’t be bullied by the distortions and the narrow space.
The Right Tackle
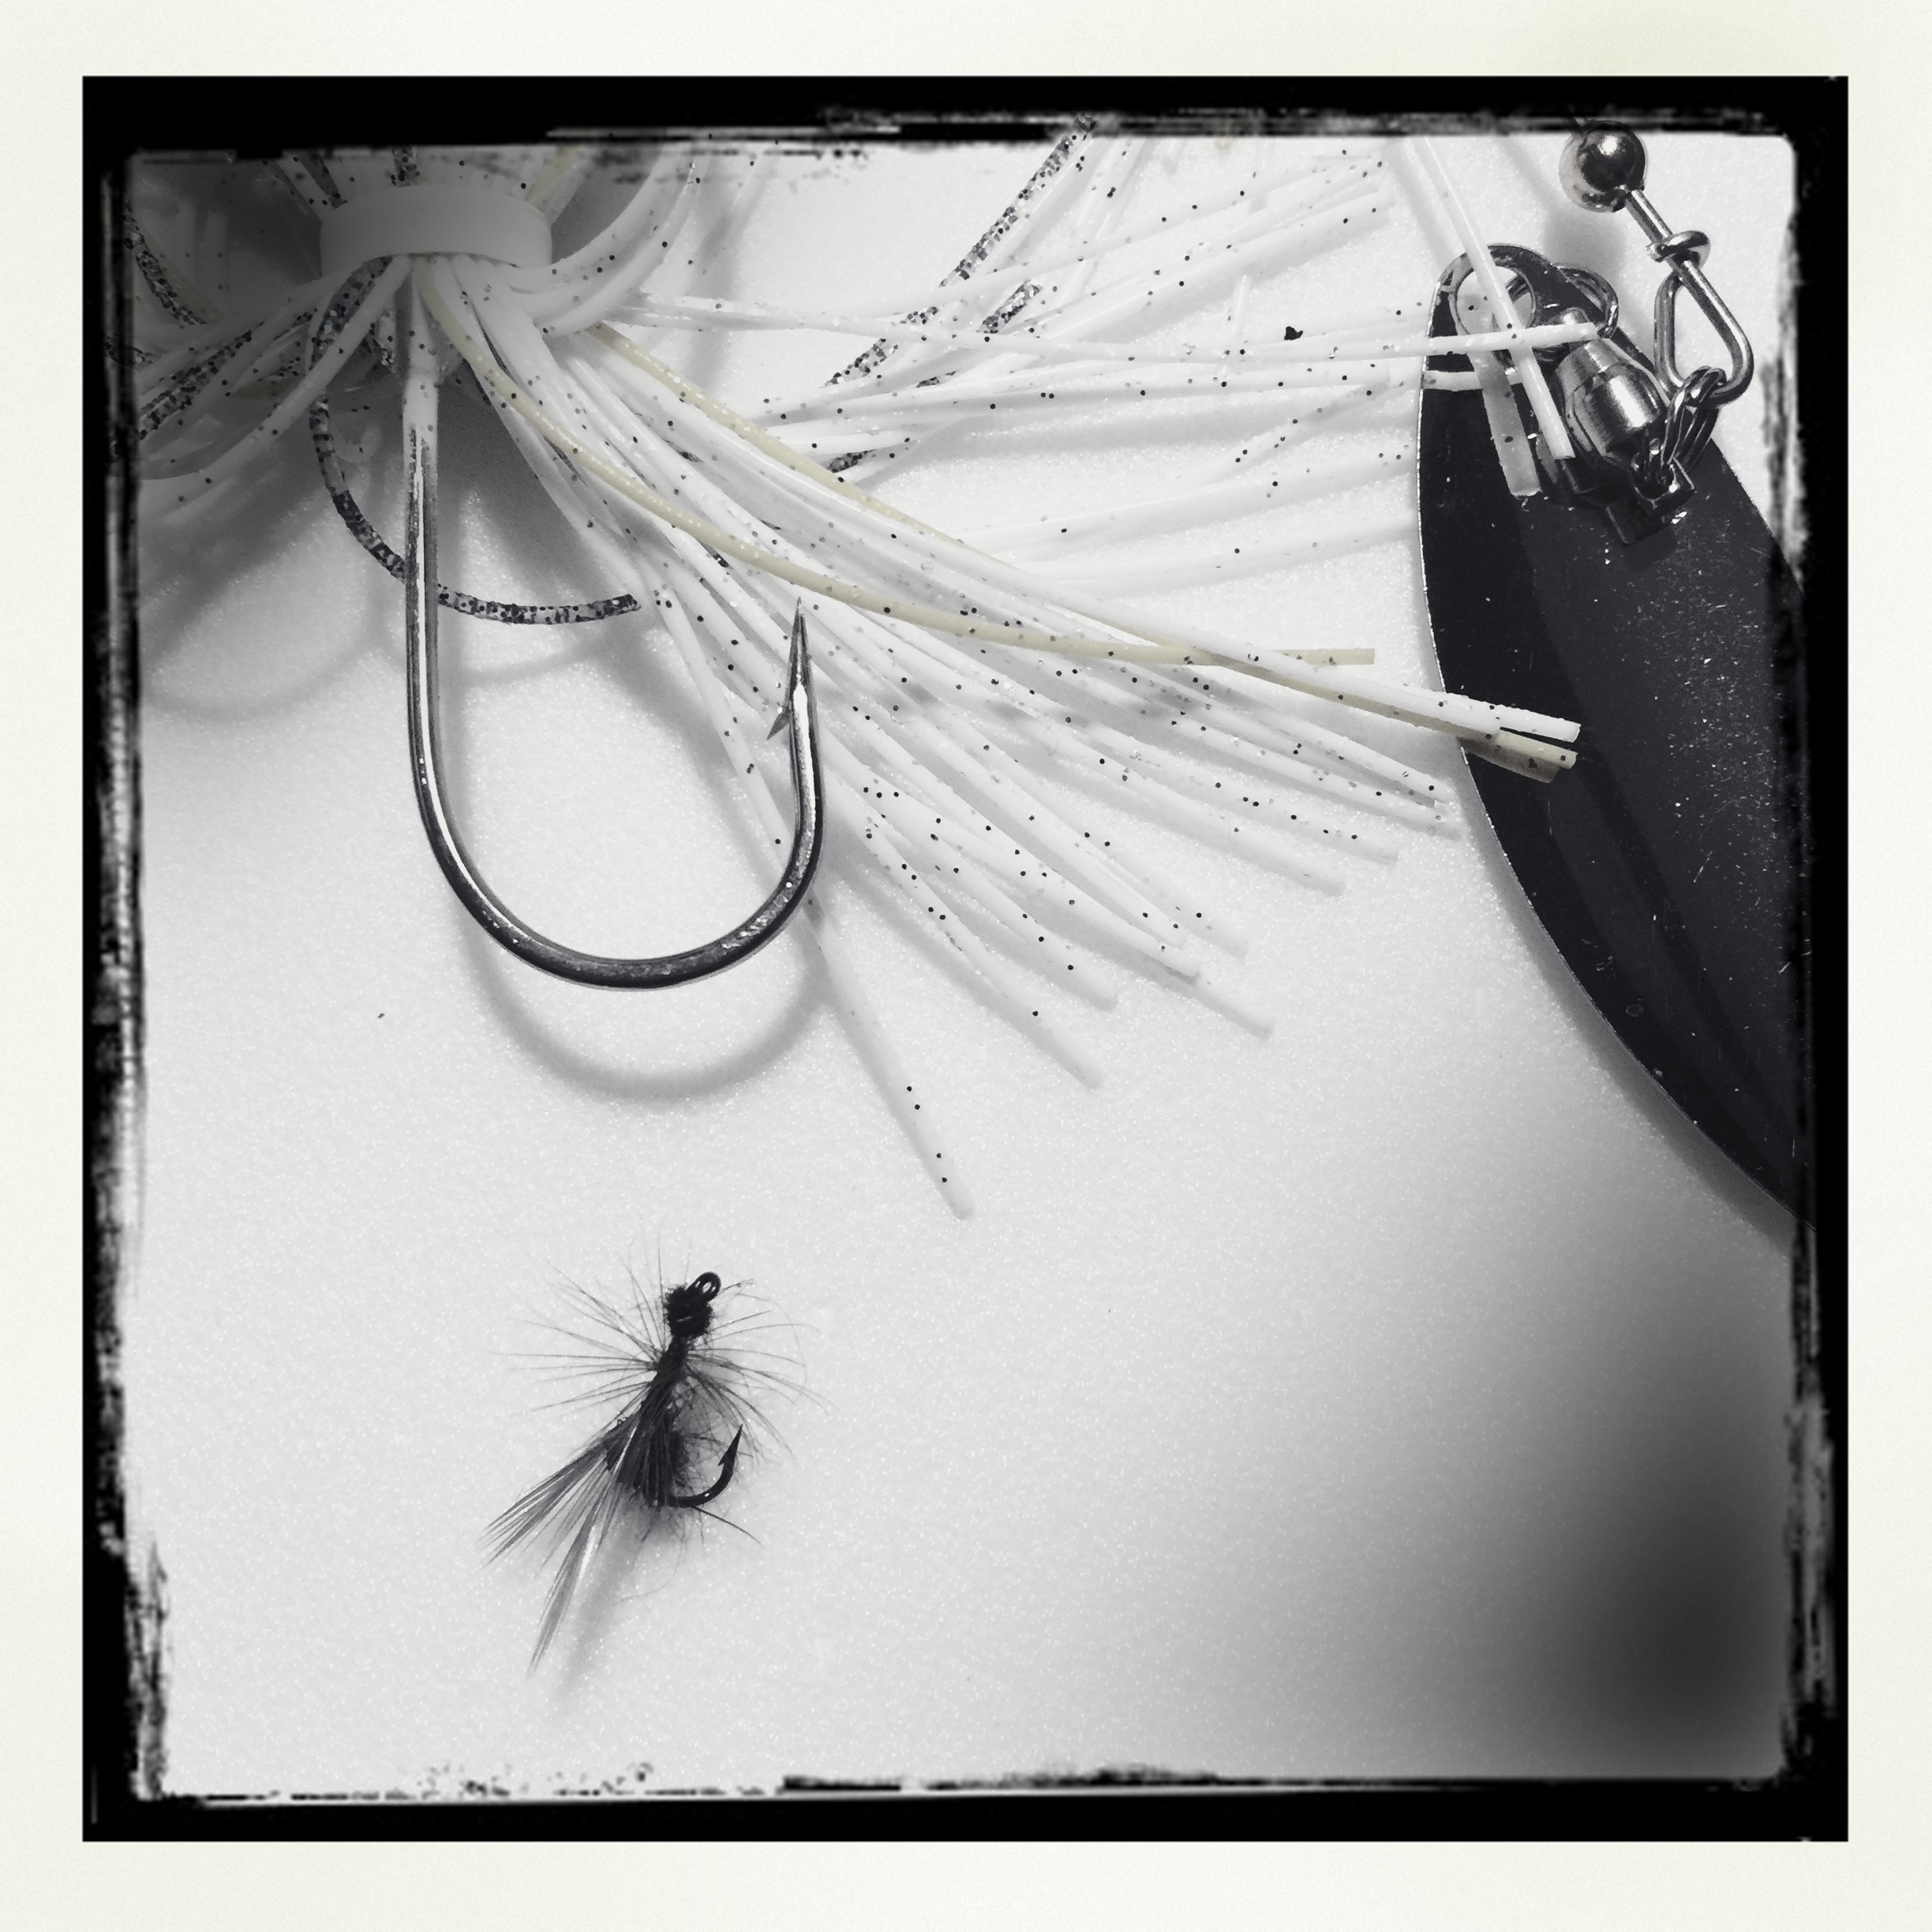
You don’t go after panfish with a deep sea tackle. Pictured below are a spinning lure for trolling with a large hook and a small dry fly with narrow guage hook for comparison.
Which hook creates the larger hole in the fish’s mouth? In fact, both lures can be used to catch the same large trout, but in different situations.
On a lake, large hook, on a stream, small hook for same fish.One of the techniques which I have borrowed from our partners in cardiac surgery here at the clinic is using smaller guage monofilament and needles. I once co-scrubbed an aortic arch case with Eric Roselli, and was bemused to see him sew graft to the fearsome ascending aorta with 5-0 monofilament suture. Then I saw no needle hole bleeding and was sold. Up to then, I had switched from my 3-0 on SH needles to 2-0 on MH needles -basically the largest vascular needle, and saw posterior aortic wall break down from the needle trauma. Unfortunately, 5-0 suture doesn’t come long enough, the CV needles aren’t big enough to sew posterior wall. I now use 4-0 on SH with 48cm length suture. Ideally, we’d have a 5-0 monofilament on a 60cm suture with a SH shaped and sized needle with the narrow guage of the CV needle.
Also, because the needles are finer and I favor supersized Castro needle holders. The needle holes which represent rents in the aortic wall are far easier to deal with using a smaller needle. Right tackle.
The patient is middle aged and had a type B thoracic aortic dissection (TBAD) as a consequence of recreational substances that acutely raised his blood pressure. At the outside hospital, he had a CTA showing the dissection extending from his left subclavian artery and causing occlusion of his superior mesenteric artery (SMA). He developed abdominal pain and was swiftly transported to our acute aortic syndrome unit. He was taken to the operating room and underwent a TEVAR of the dissection and stenting of his SMA -this is similar to other cases I have discussed in prior posts so I am omitting the technical details. The stent covered the left subclavian artery origin to exclude the origin of the dissection. The stent was extended to the distal thoracic aorta but did not go to the celiac origin.
Post procedure, his lactate never rose and he was maintained on the usual post procedure protocol of keeping MAP’s (mean arterial pressure) above 80mmHg. His left subclavian artery was covered but I do not routinely bypass, especially when the left vertebral artery is at least equal in size to the contralateral one. I don’t often place spinal drains for urgent/emergent cases particularly in patients who have never had infrarenal aortic surgery and patent hypogastric arteries. He was kept sedated overnight and awoke in the morning unable to move his legs to command. He had no pain sensation up to his umbilicus.
A spinal drain was emergently placed and his blood pressure was raised to MAPs of 90+, but these failed to reverse his paralysis. After discussion among my world class partners, I chose to take the patient back for a carotid subclavian bypass which was done through a single incision with a dacron bypass graft.
His paralysis resolved. He was discharged home, ambulating without assistance. Spinal cord complications are reported to occur between 1-5 percent of patients undergoing TEVAR for complicated TBAD. They were seen in 2 of 72 patients in the TEVAR arm of the INSTEAD trial (Circulation, 2009 vol. 120(25) pp. 2519-28), and was permanent in 1. While there are some who routinely place prophylactic drains, it is unclear to me that they have a significant effect if placed unselectively. I will place a Preop drain in the instance of infra renal graft, hypogastric arterial occlusive disease. In the instance of a dominant left vertebral, I will perform concomitant bypass, but just as often not. This is a gratifying and rare outcome of paralysis reversed with a carotid subclavian bypass when spinal drain and permissive hypertension did not.
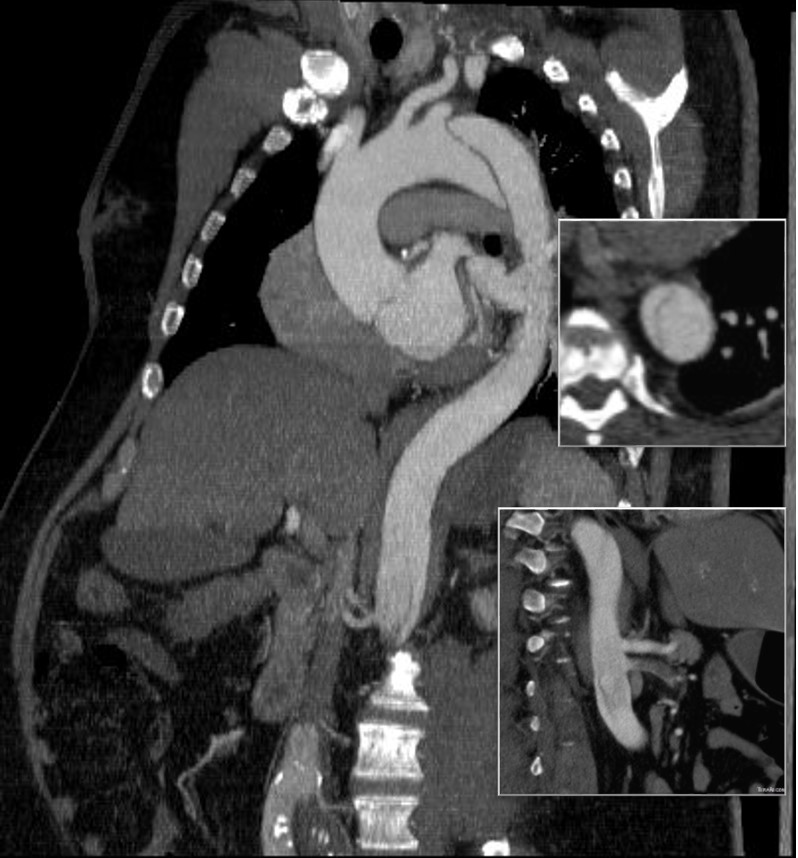
The patient was referred to me after having undergone an intervention for chronic mesenteric ischemia. She is over 70 years of age and had lost over thirty pounds in 3 months due to severe abdominal pain with eating. A month prior to seeing me, she had undergone arteriography at an outside hospital and was found to have occlusion of her celiac axis (CA) and superior mesenteric artery (SMA) with a small but patent inferior mesenteric artery. Attempt at recanalization, done from left brachial access, of the SMA was abandoned after the patient started having pain, and the inferior mesenteric artery was accessed and stented with a balloon expandable stent. Despite the stent, the pain persisted. On examination, she was cachectic, weighing about a hundred pounds, and had moderate to severe pain with abdominal palpation. CT angiography (shown above) showed a chronically occluded CA and SMA and a patent stent to the IMA.
After discussion with the patient about the possibility of a bypass, we decided to proceed with diagnostic arteriography and an attempt at recanalization. When planning these, I always try to come from the groin first as most of the time I am able to revascularize from below. I try to avoid 6F sheaths in the arms of thin cachectic patients -women especially where the brachial artery is likely the same diameter as a 6F sheath. The only downside about coming from below is that it is technically challenging and the stent comes off at a higher angle than the SMA typically has in situ.
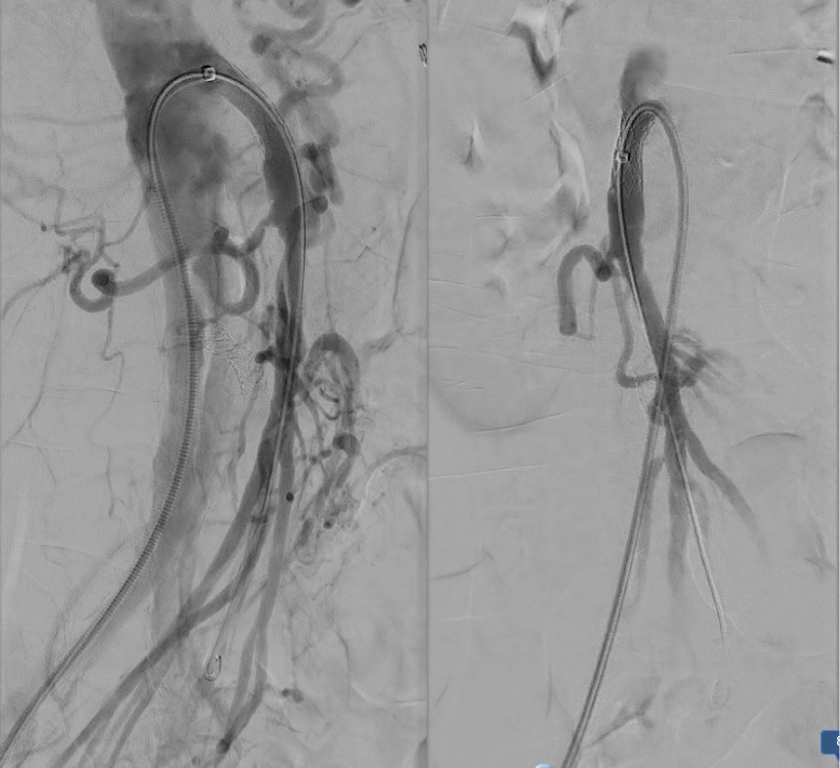
The image below shows the procedure:
The series of images shows the initial aortogram and access. The superior mesenteric artery has a stenosis at the origin, with an area of post stenotic dilatation or small aneurysm, which occludes beyond the first three branches of the SMA. The IMA fails to feed the bowel -the later phases not shown shows filling from the SMA segment to the CA and ileal branches.
The key step to this procedure is in getting “deep” access with a wire -in this case a floppy Glidewire, which I used to cross the occluded SMA. There is feedback from the tip which occurs if you spin it without a torque device. The wire has the quality, a feature really, of being tacky when dry, allowing for a great deal of coaxial spin with your first two fingers and your thumb. The tip transmits information about what it is crossing as you spin it -this is something that is hard to teach at first, but is gained largely through experience, but I learned it from Dan Clair over a decade ago when he barked at me to get rid of the torque device (“a tool for babies!”). The tip will go where it should if you spin, not push.
Once the wire is buried, a suitable catheter that tracks well is brought across the occlusion. Again, while there are many catheters that can do this, the Glide Catheter is suitable again from spinning across an occlusion over the wire that would push out the lowest profile and equally hyrdophillic catheters. Once the catheter is buried, a suitably stiff wire (in this case a Rosen wire) should be brought across -this widens the arc created by the wire as it goes up and over the SMA origin and allows for delivery balloons and stents. Using the balloon-piton technique (a requisite for FEVAR), the sheath is brought into the SMA, securing access into it.
The occlusion in the mid-SMA ballooned nicely and did not require a stent -a nonocclusive dissection is seen but I chose not to treat this as placing a stent is likely to cause as many problems as solve and the dissection is in line with flow. The origin was stented with a balloon expandable stent -having the patient awake is useful in determining if the stent is “big enough.” Final arteriography in two planes is shows below.
Gratifyingly, the entire mesenteric system in the CA (foregut) and SMA (midgut) lit up. I admitted her for observation as I have seen patients develop bowel infarction with reperfusion which may be due to embolization but I think just as likely due to edema. Food needs to be reintroduced slowly as there maybe metabolic consequences to rapid refeeding. Her baseline lactate was 2.6mMol/L but came down to 0.8mMol/L the next day. Her other labs were normal. Her pain remitted and she was able to tolerate a regular diet by postoperative day 2.
Discussion:
Mesenteric ischemia is a particularly morbid condition. When it presents acutely, there is a high mortality rate (ref 1). Revascularization in good risk individuals is still bypass surgery (ref 2,3). The inferior mesenteric artery offers a dismal revascularization target for this reason -while the artery will remodel and dilated in the setting of mesenteric ischemia, its orifice from the aorta does not and is usually no more than 1-2mm from birth to adulthood. Also, while the large bowel will get perfusion from the IMA, and the foregut may get collateral flow from collaterals fed from the middle colic via the Arc of Riolan, the midgut does not get sufficient flow from from the IMA because it requires the longest path to fill the ileal and jejunal branches. The development of atherosclerosis in the aorta further complicates attempts at stenting. Despite this, it is still attempted (ref 4) and in 4 patients was successful at relieving pain for short periods of time, with one patient requiring eventual bypass despite characterization as “high risk.” It is a reflection of how poorly this vessel does with intervention that this 4 case series is the largest in the literature.
The analogy to IMA stenting in the legs is stenting of a heavily diseased profunda femoral artery in the setting of critical limb ischemia with femoropopliteal occlusive disease. It is occasionally successful in the short term, but will only delay the inevitable operation. There are no low risk patients with severe weight loss due to mesenteric ischemia. Aggressive intervention offers a path of survival for these patients, and but long term results are only possible with bypass.
Park WM, Cherry KJ, Jr, Chua HK, Clark RC, Jenkins G, Harmsen WS, et al. Current results of open revascularization for chronic mesenteric ischemia: a standard for comparison. J Vasc Surg. 2002;35(5):853–859.
Kasirajan K, O’Hara PJ, Gray BH, Hertzer NR, Clair DG, Greenberg RK, et al. Chronic mesenteric ischemia: open surgery versus percutaneous angioplasty and stenting. J Vasc Surg. 2001;33:63–71.
Wohlauer M, Kobeiter H, Desgranges P, Becquemin JP, Cochennec F. Inferior Mesenteric Artery Stenting as a Novel Treatment for Chronic Mesenteric Ischemia in Patients with an Occluded Superior Mesenteric Artery and Celiac Trunk. Eur J Vasc Endovasc Surg. 2014;27(3):e21-e23.
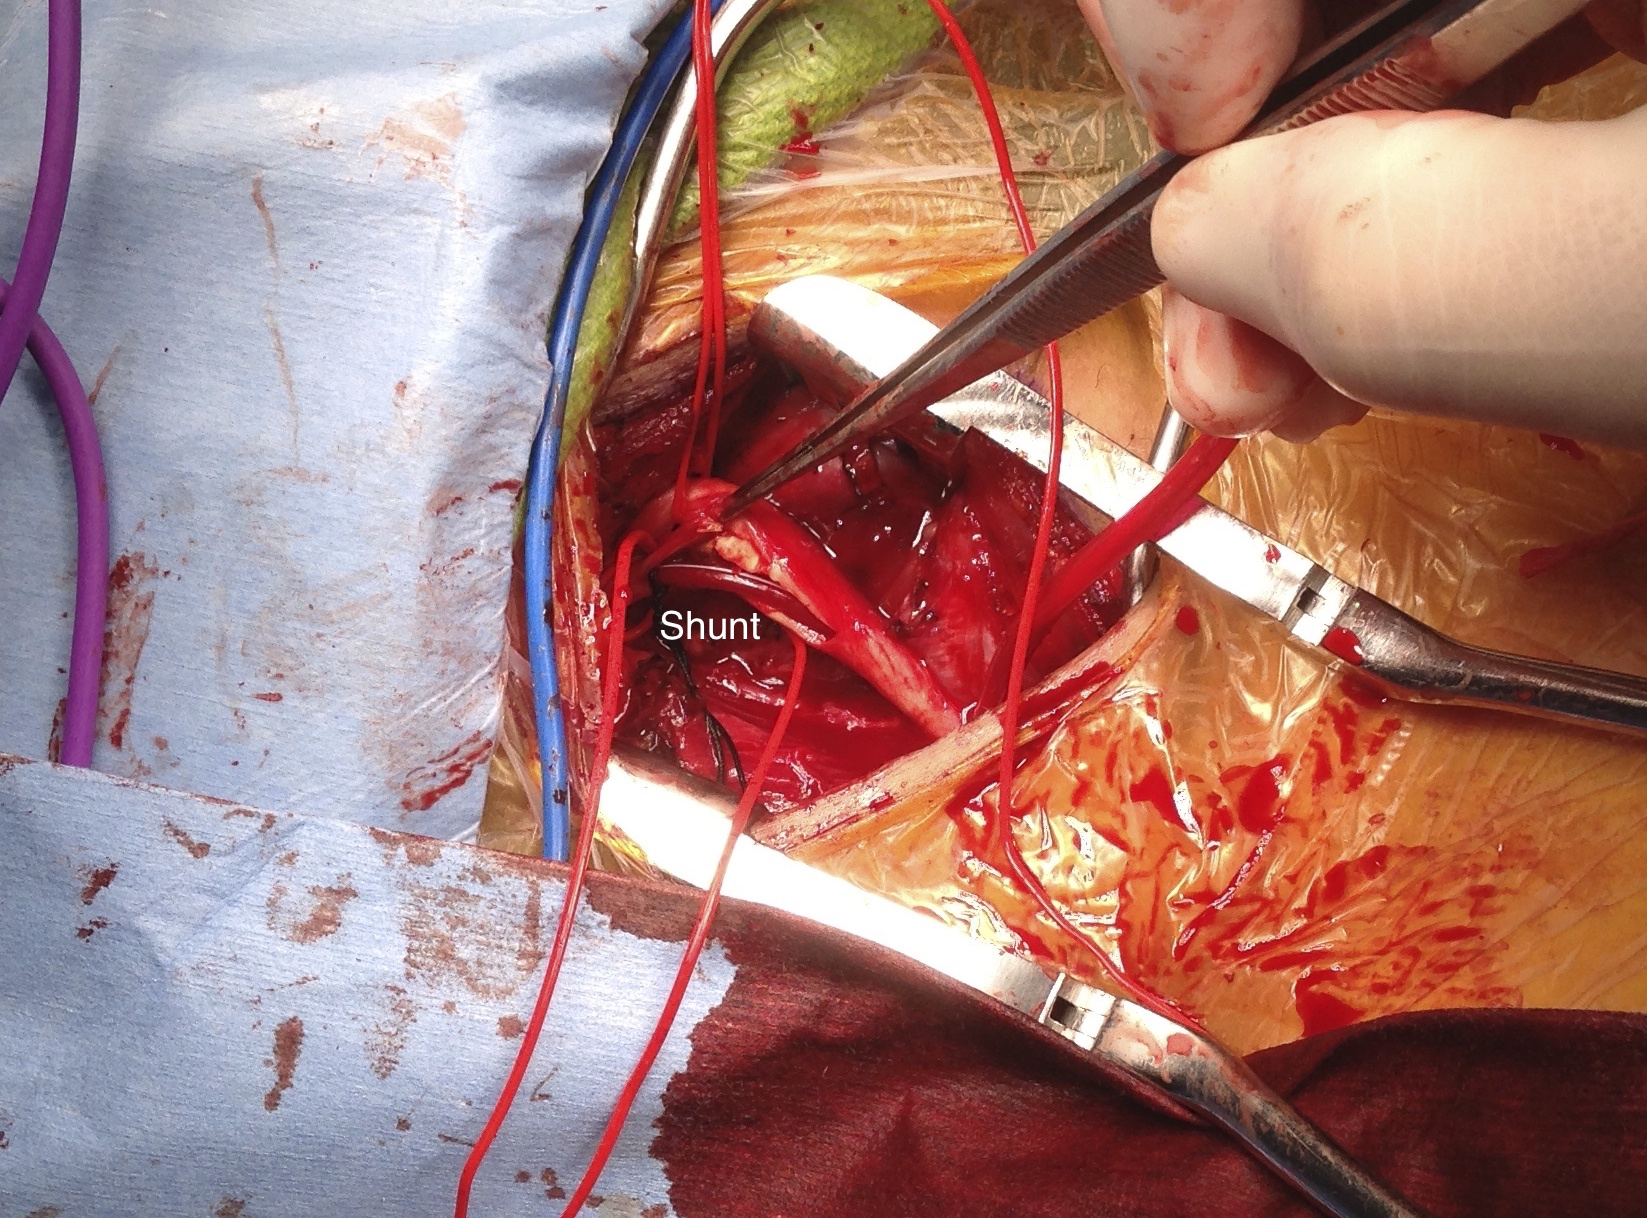
I was asked to assist one of my otolaryngology colleagues in extirpating a neck tumor that encroached on the carotid artery at the base of the skull early in my career. While the operation was complex and interesting, the most impressive part of it was the complete exposure of the neck from base of skull to the base of neck that was possible with an oblique skin line incision. This challenged bias I had about “exposure,” because up to that time, I had done the mastoid process to manubrium incision along the anterior border of the sternocleidomastoid muscle. What was doubly remarkable was that the incision was invisible in followup despite curling from ear to epiglottis because it was hidden in the fold under the submandibular fat.
This patient above had his carotid endarterectomy performed with a skin line incision. He didn’t even need his beard shaved for the operation.
The key is developing subplatysmal flaps like the kind you make with thyroidectomy. This allows cephalad and caudad exposure. More exposure means just extending the incision medially and laterally. These flaps heal well. This with retraction allows for excellent exposure of the neck.
The other advantage is that the fat is never cut across but completely avoided if you go under it and lift it up. The incision is far less disfiguring and heals well because the forces co-apt the skin without relying on tension from the closing sutures. Preop planning with CTA and 3D virtual reconstruction confirm where the incision should be placed. But most of all, the patients appreciate not having a scar on the neck that they have to constantly explain.
Planning starts with visualizing the proximal and distal extend of plaque needed to be removed.
The 3D reconstruction view can be “Window Level”-ed to bring in soft tissues and skin to anticipate the operative exposure.
Experience has shown me that it is possible to avoid cutting through the fat on the neck, and what is visually the lower part of the face as much as it is the neck, but performing this oblique incision in the skin fold.
The trick to doing a 10 minute renal PTAS is all in the planning and visualization. Firstly, the CTA with 3D reconstruction (TeraRecon) gives excellent diagnostic images for arteries above 2mm in diameter and therefore obviates the need for additional diagnostic imaging if obtained before the planned intervention. The arteriography for the intervention then is focused on confirming the pathologic findings of the CTA. This patient has had prior lower extremity revascularization and has been troubled by difficult to control hypertension (4 meds) and mild renal insufficiency. Renal duplex found elevated velocities consistent with a >60% stenosis of his right renal artery. CTA revealed this, but also demonstrated a wealth of information regarding his aorta, his aorto-bifemoral graft, an asymptomatic SMA stenosis. So my initial plan was given his hypertension was to perform a focused renal arteriogram and intervention with minimal time and contrast.
Planning
The first thing I did was go to TeraRecon and plan out access and camera angles. The CTA can show troublesome plaque, tortuosity, or lesions that could spell trouble for access. I decided to access the right hood of his aorto-bifemoral bypass graft above the anastomosis of his fem-pop bypass. Scar tissue, which can be problematic for sheath entry, can aid in excellent hemostasis. The camera angles and location of the renal arteries were determined with TeraRecon. I angled the view to see the right renal artery (above) at a orthogonal plane to my perspective -this turned out to be 20 degrees (see below).
Without TeraRecon, this is possible with axial views by creating a clockface and generating an “o’clock” with each hour being about 30 degrees (see above). The origin of the right renal artery is about 9:30 by this scheme. This give me the camera angle to find the renal without shooting an aortogram solely for the purpose of locating the renal artery. We already have an aortogram in the form of a CTA. The 3D reconstruction also informs us that the renal artery comes off at the base of the L2 spinal body at about 15 degrees LAO.
This processed image from TeraRecon shows the skeletal landmarks where the origin of the RRA would be. The LIMA catheter is drawn on.
Access
I performed ultrasound guided access of the right femoral graft limb. Ultrasound allowed me to avoid the fem-pop graft. A micropuncture kit uses a small guage needle which is allows for repuncture. The sheath that comes with this comes with a stiff variant which goes through scar tissue well. I place a 6F sheath and send a wire into the aorta over which I send a 6F LIMA guiding catheter. This is actually a “cardiology style” of access, and the way coronary arteries are accessed. The guide catheters do need to be set up with Touhy-Borst connectors and 3 way stopcocks.
With the camera properly pre-angled, when the LIMA catheter comes in full profile, it should aim the tip at the angle of the takeoff of the renal artery. Using a 0.14 wire (Spartacor) in my case, I start probing with the wire tip at the base of L2 -another important piece of preplanning data. Usually, access to the renal artery is very straightforward at this point. The Spartacor wire has the backbone to support passage of stents and balloons. I use a 145cm length wire, and stents mounted on rapid exchange catheters. Renal arteriography is done through the LIMA catheter with hand injection, and intervention is very straightforward.
The predeployment arteriogram shows the renal orifice to be smaller than the 6F LIMA guide catheter. After stenting, the artery no longer has a stricture at the origin.
The rapid exchange systems allow for quick catheter exchanges. Wires and catheters are removed. Total procedure times 10-15 minutes, and total contrast volume 10-20mL of contrast. This camera prepositioning, catheter profiling, spinal body aiming technique also works well in EVAR if you don’t have the 3D mapping package. Extra arteriography in localizing the renal orifices can often be avoided.