Categories
PAD techniques training

Popliteal Endarterectomy and Short Bypass in Lieu of Multisegment Vein Bypass

The patient is a very pleasant elderly lady who had a prior EVAR complicated by graft limb thrombosis treated with thrombectomy. She recovered from that but subsequently developed ulceration of her left ankle. She had been sleeping in a chair because it hurt her to sleep flat –her leg and foot would burn with pain. A wound care center had tried an Unna’s boot, but it caused her worse pain, and the ulcer increased in size. At admission, she had an exquisitely tender, edematous leg and ankle with a large ulcer weeping edema fluid. There were no palpable pedal level pulses.

I admitted her for workup and treatment of a mixed etiology arterial and venous ulcer.

These are patients for whom rest pain is relieved by avoiding recumbency, but with prolonged sitting, as in this lady, edema accumulates and starts to leak, creating an ulcer of the venous type, in the medial ankle (gaiter) region. These don’t resolve without addressing the underlying cause which is the arterial insufficiency. Fixing the arterial insufficiency then allows for leg elevation and compression. For the trainees, venous ulcers almost uniformly heal with Unna’s boot therapy. Elevation should relieve discomfort in venous ulcers. Neither of these occurred and raises the suspicion of arterial insufficiency.

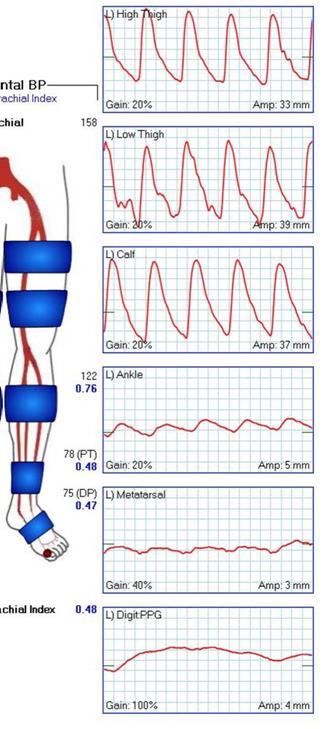
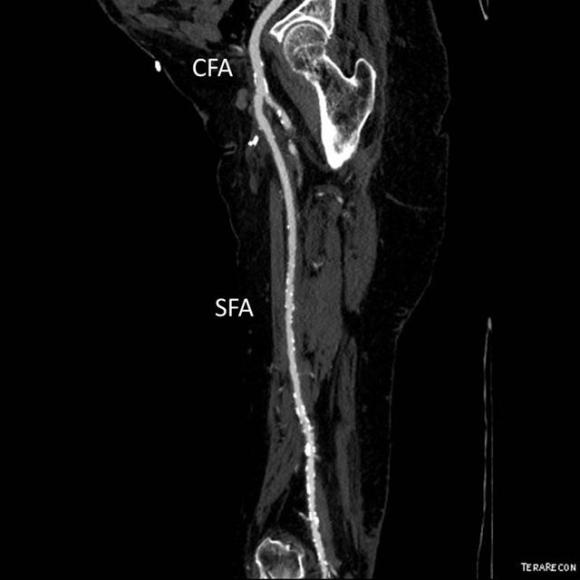
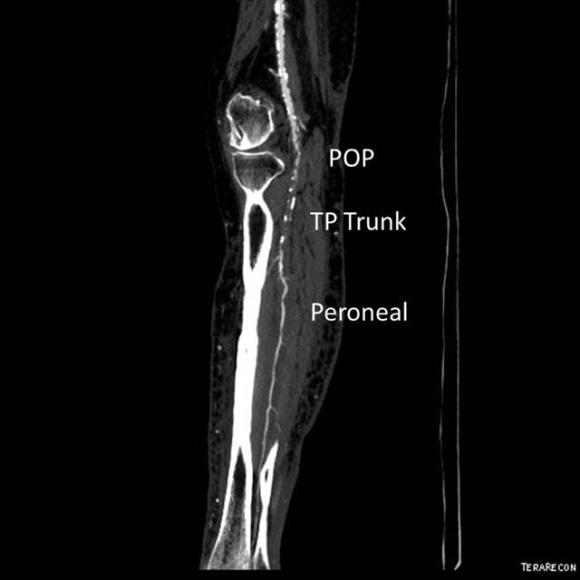
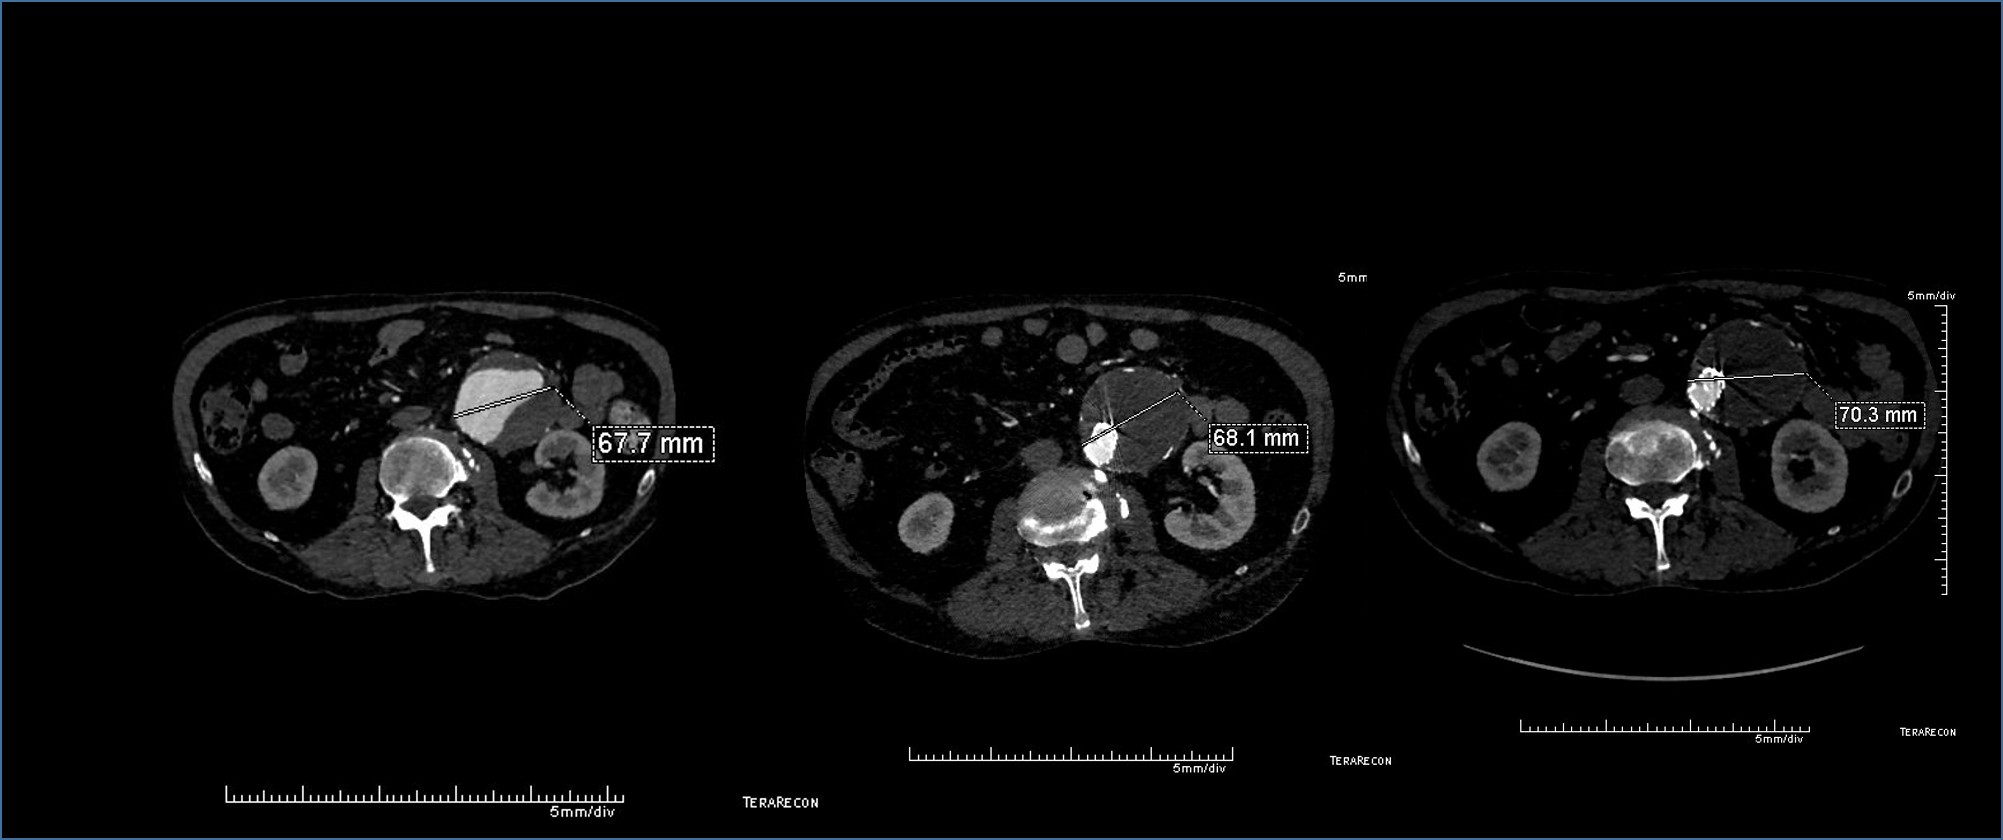
At admission, her PVR’s showed severe popliteal/tibial level occlusive disease. CTA was performed and it showed the common femoral and superficial femoral arteries to be patent but plaque occluded the popliteal artery and origins of the tibial vessels.

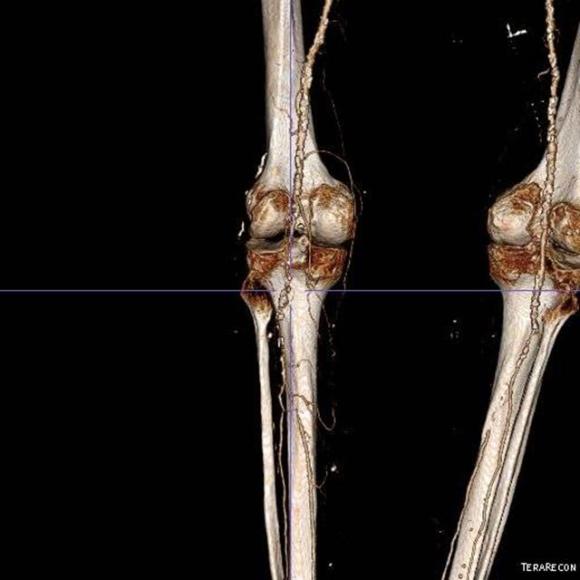
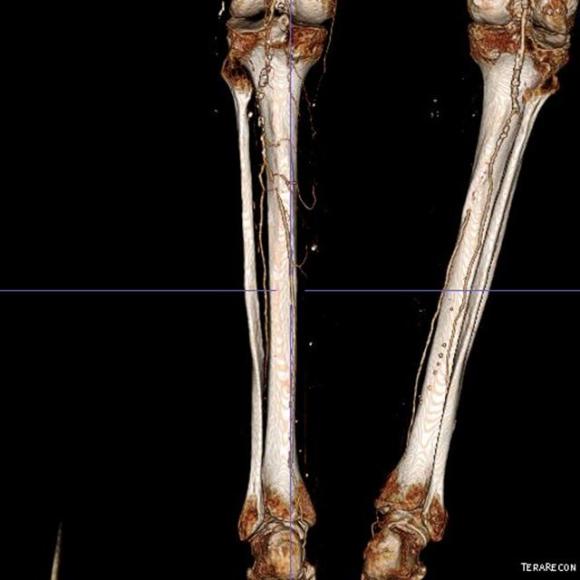
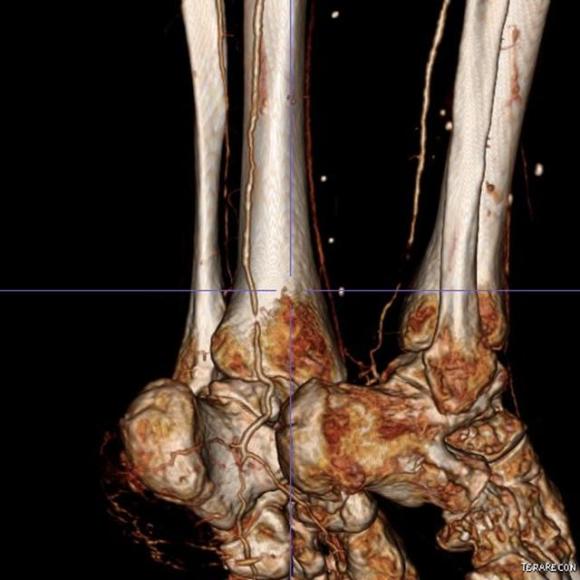
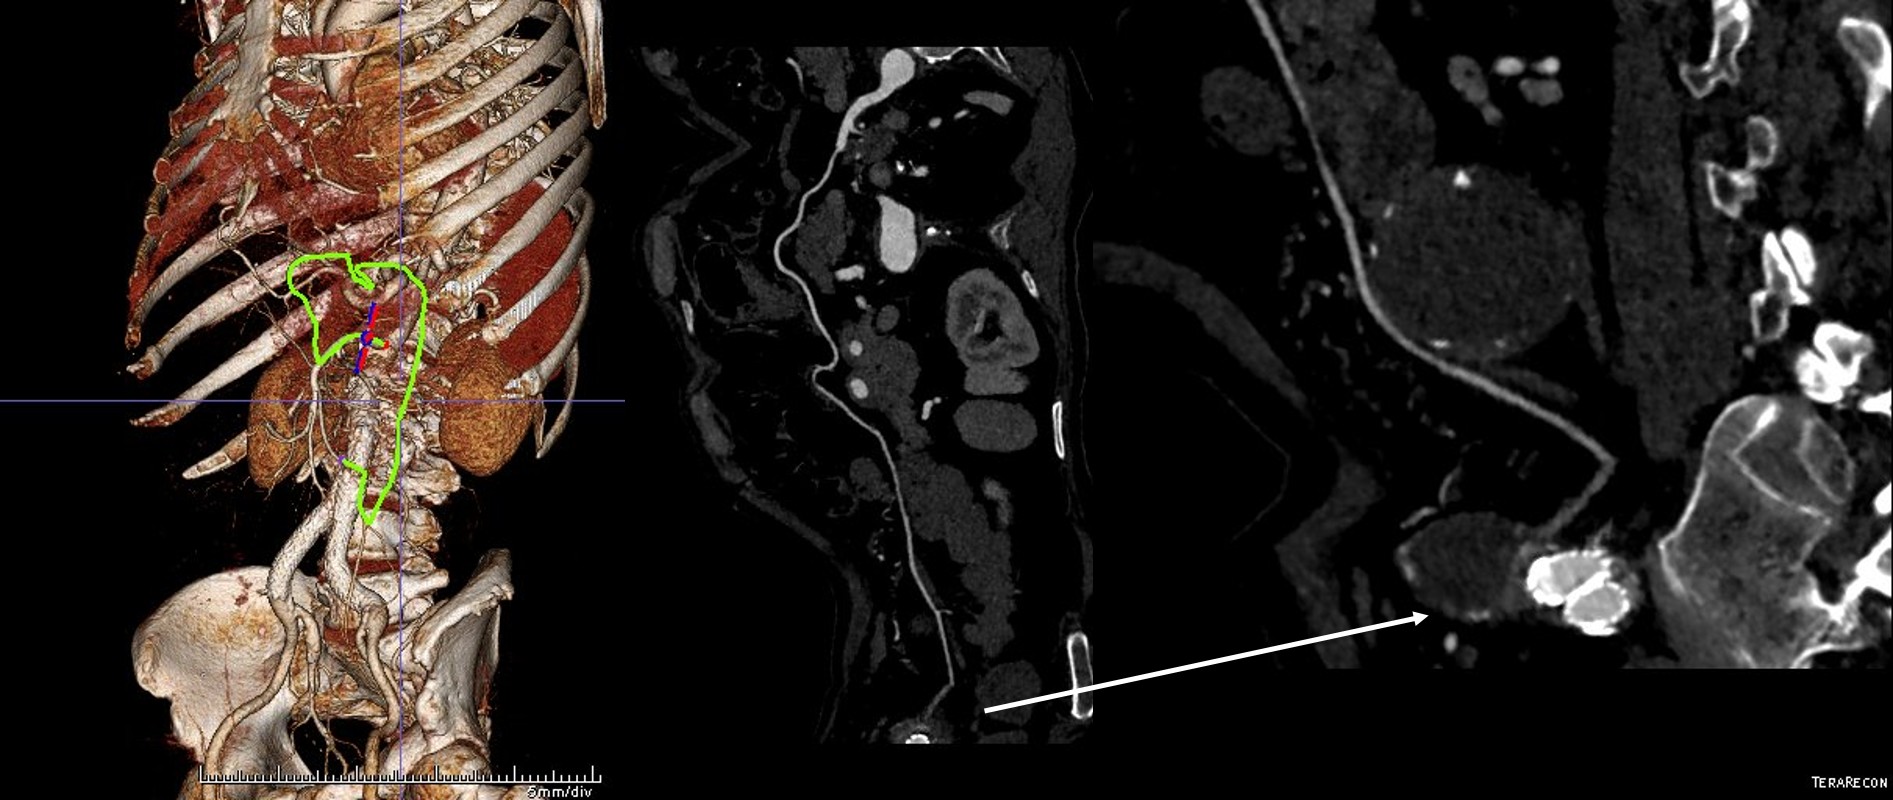
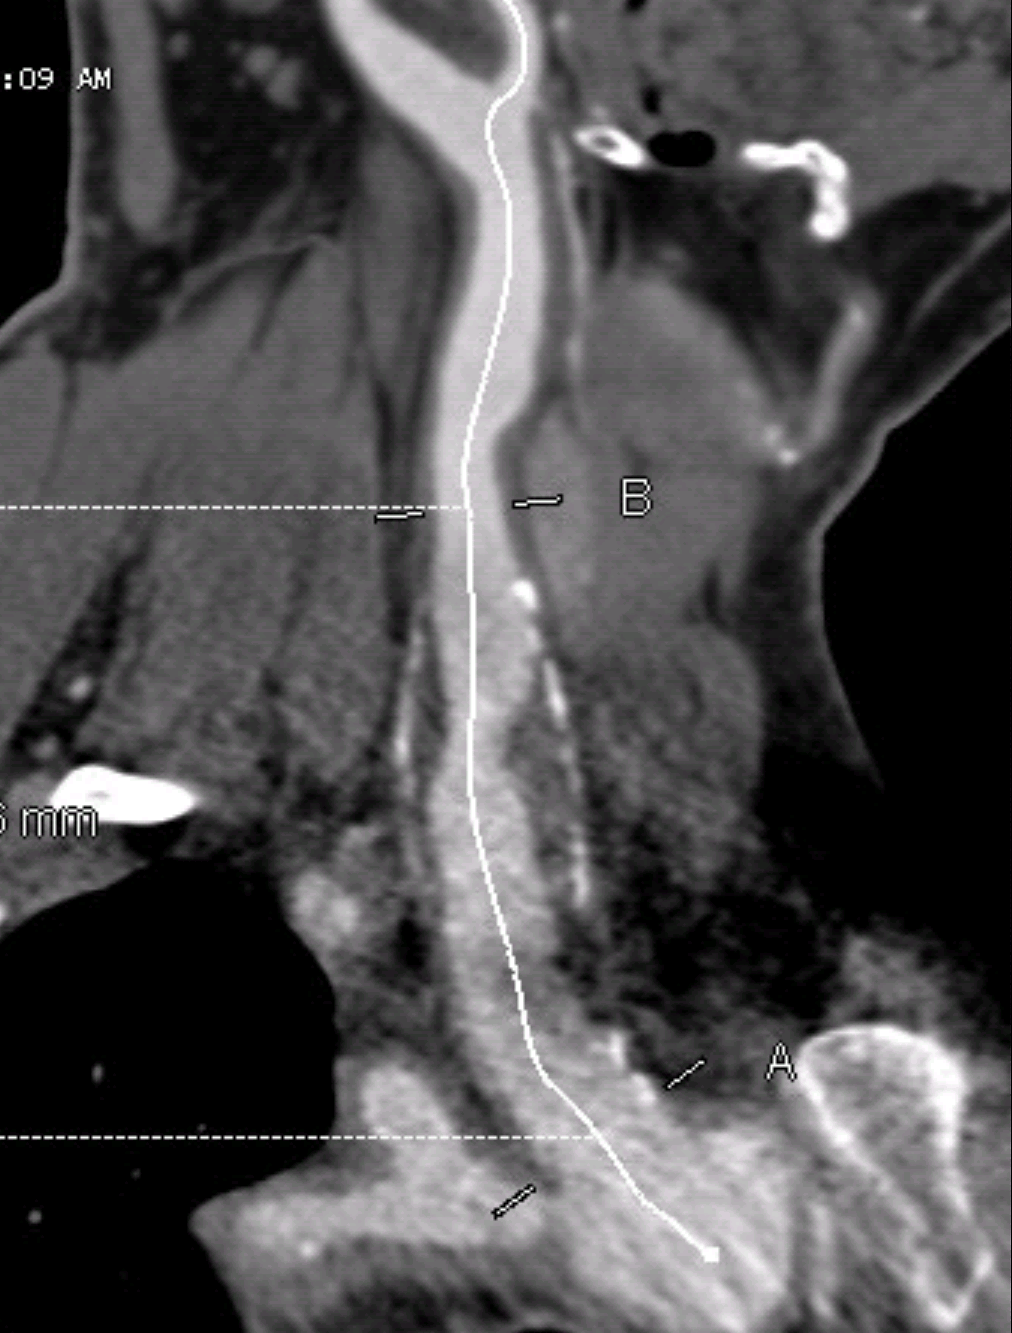
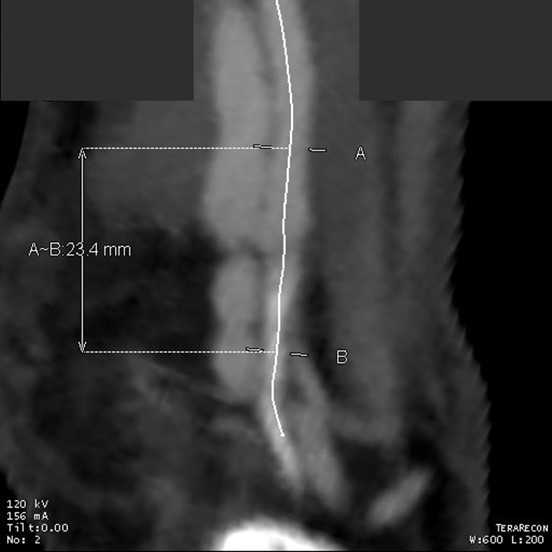
The only patent runoff was via her peroneal artery. Centerline evaluation of the CT scan was performed, with manual centerline created through the occluded segment of popliteal artery. I find this useful for planning endarterectomy and bypasses, and with attention to detail, images that are the equivalent to tibial angiograms come to life. This is a centerline through the femoropopliteal to peroneal system.

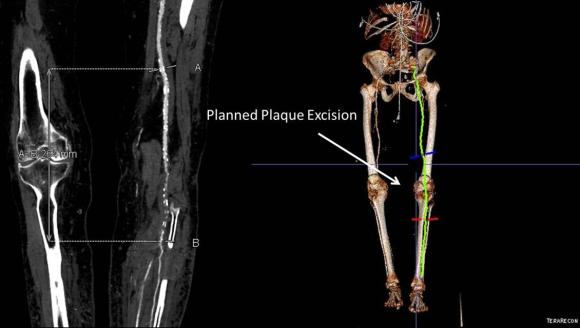
Vein mapping revealed a paucity of good vein –only a short segment in the proximal thigh on the left and for a short segment on the right. Stress testing revealed that she was good to moderate risk. Isolated popliteal occlusive disease with poor tibial runoff, while feasible for intervention, is not likely to be durable. Multisegment vein bypass on the other hand, using at least three segments, meant a long operation for this frail old lady and a prolonged recovery. I felt that popliteal endarterectomy and distal SFA remote endarterectomy offered a good option for revascularization, with either a patch repair or a short bypass to the peroneal artery. The backup plan was composite vein, but it was unlikely to be needed because the plaque was not the calcium pipe type plaque that does not endarterectomize well.

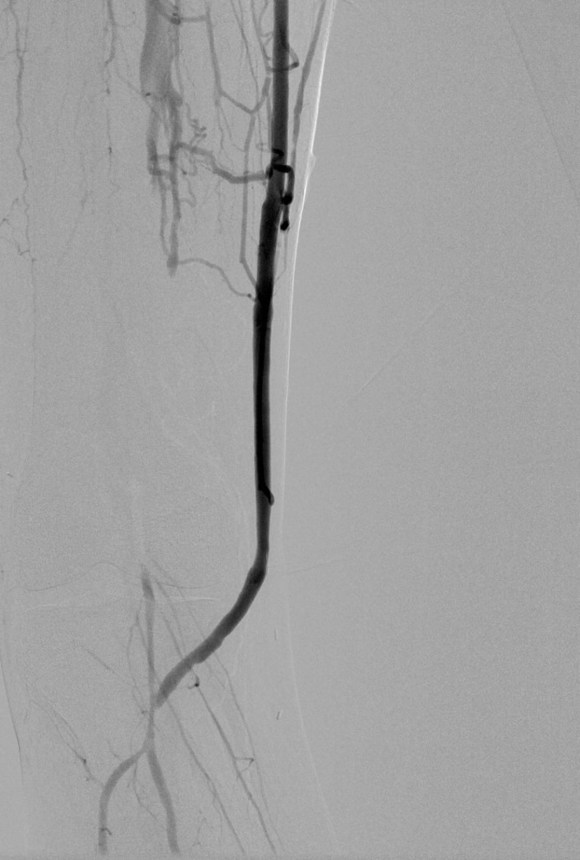
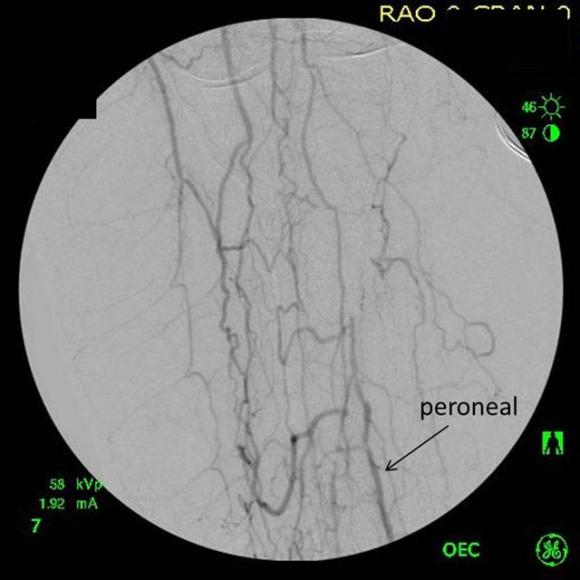
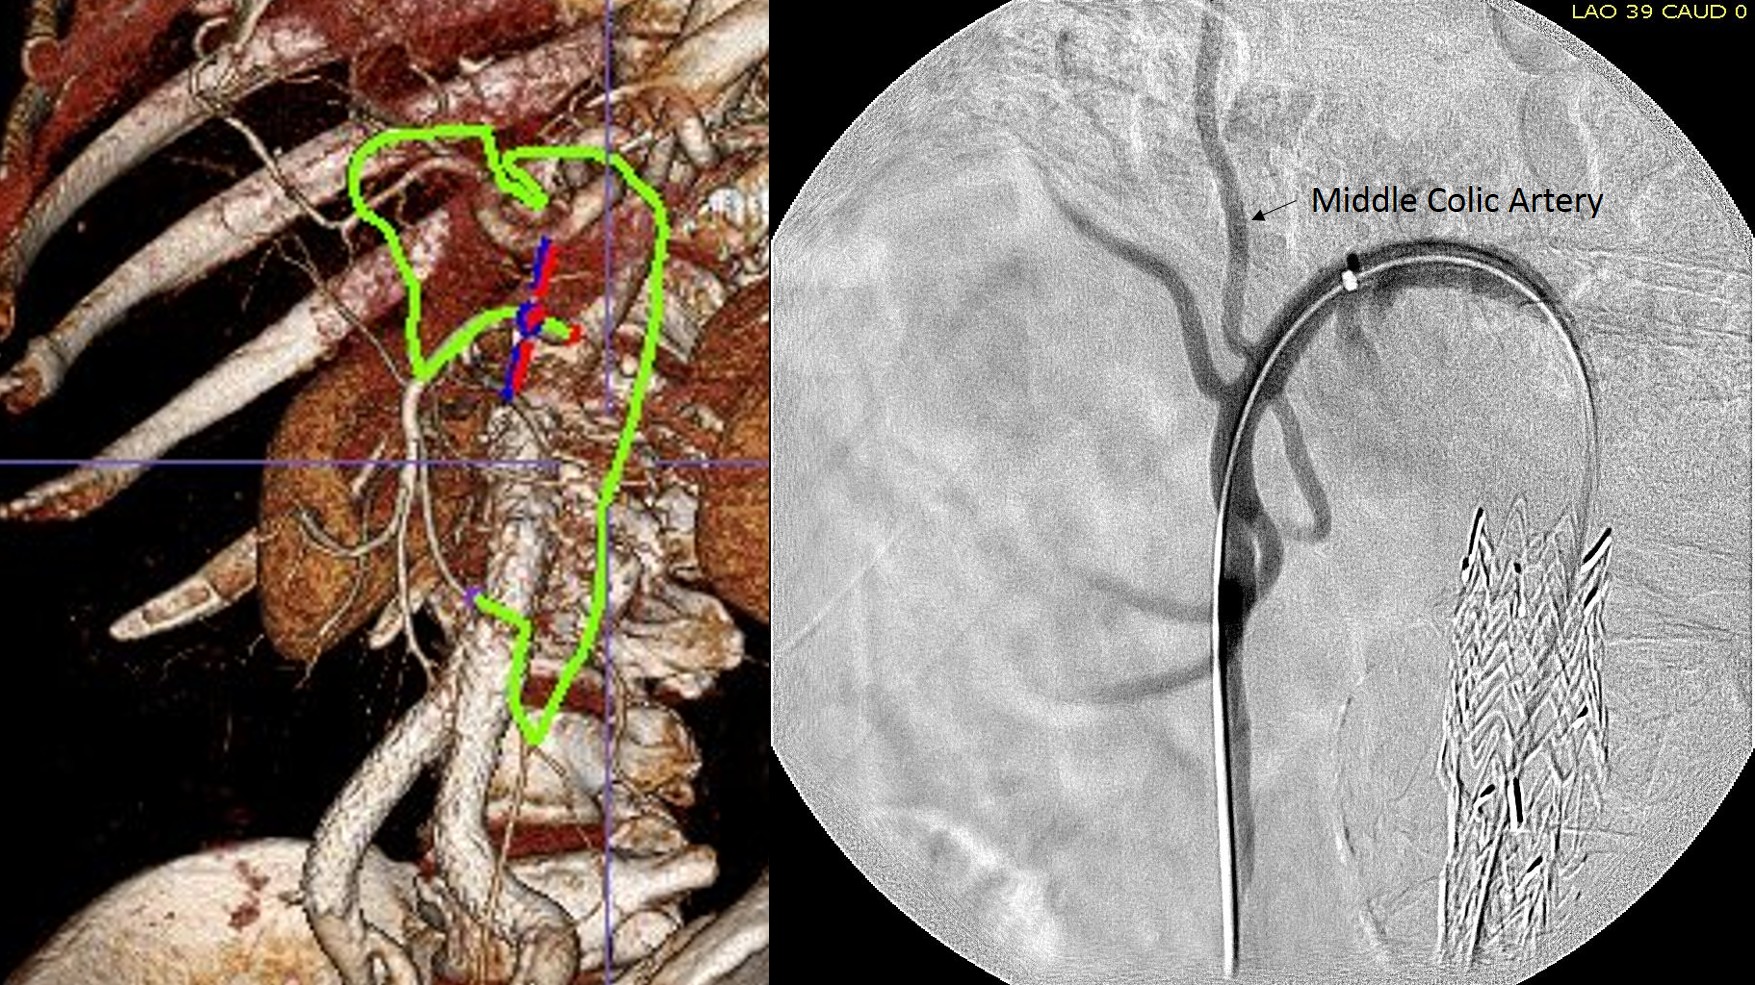
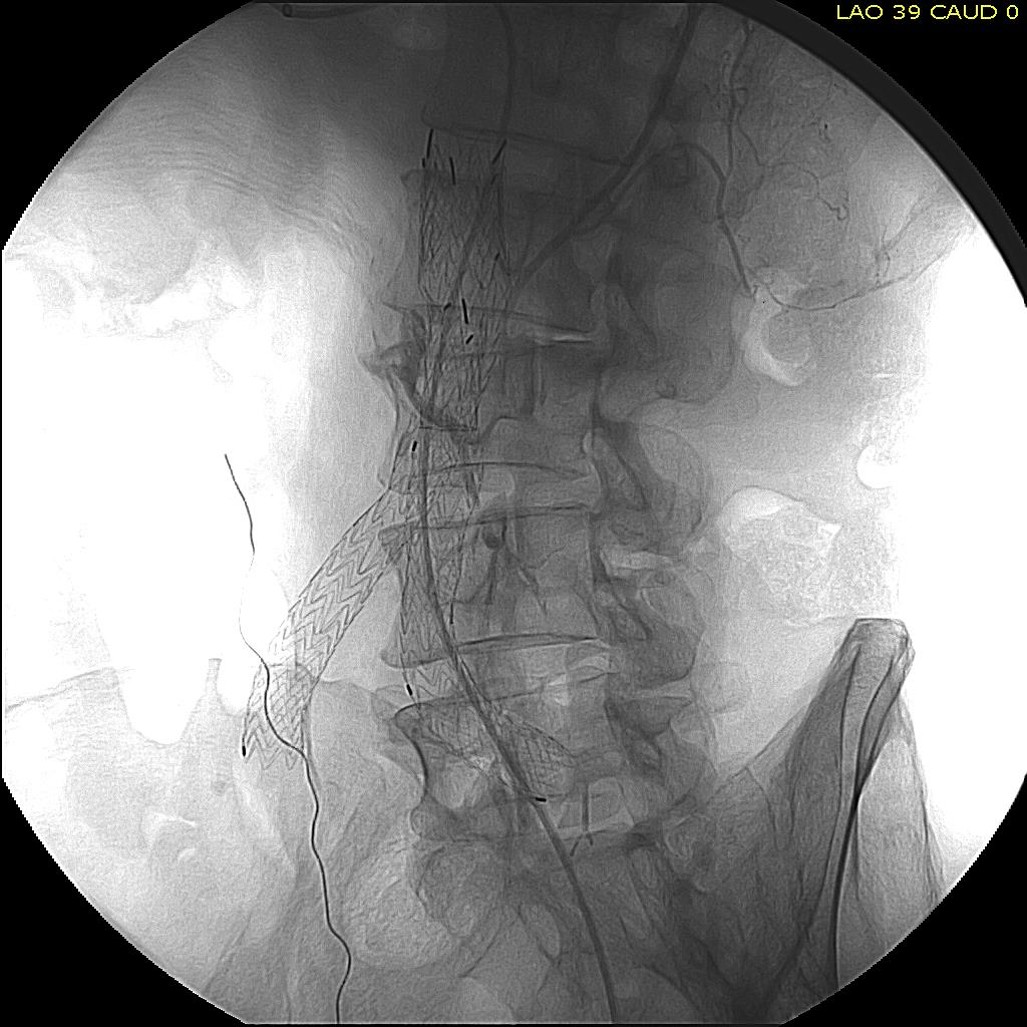
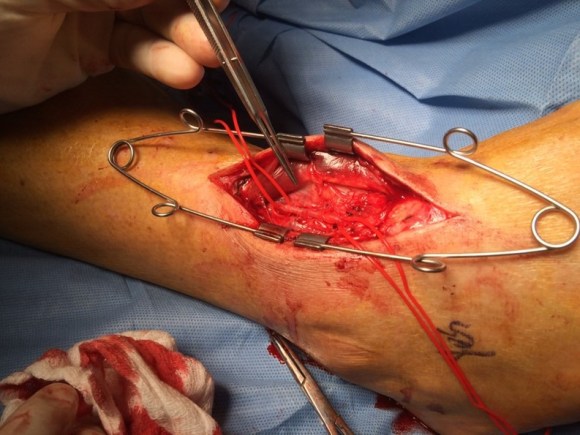
The patient was positioned on the table supine. The short segment of proximal greater saphenous vein was harvested –it was of suitable caliber, but below its first major tributary point, the veins was thick walled and small. The total length was about 10 cm. The below knee popliteal space was opened and the popliteal through tibioperoneal trunk bifurcation was exposed. Antegrade puncture of the common femoral artery allowed for arteriography and it showed the occlusion at the knee with reconstitution of the peroneal artery.

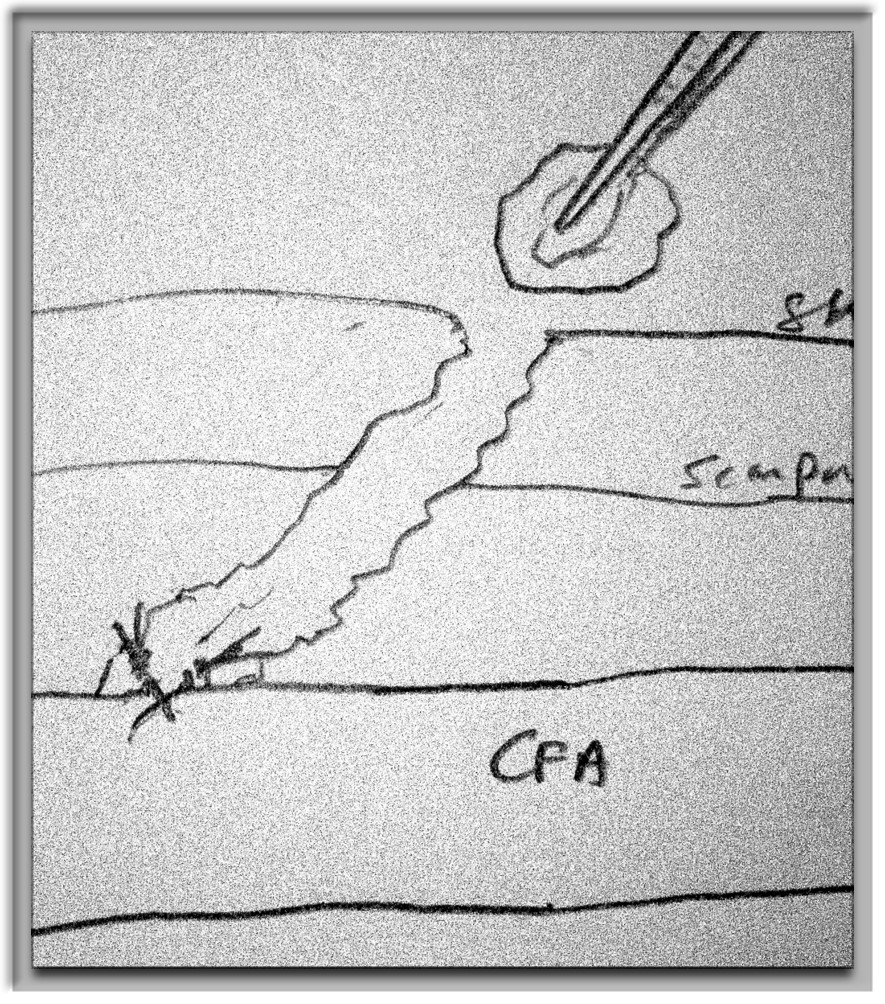
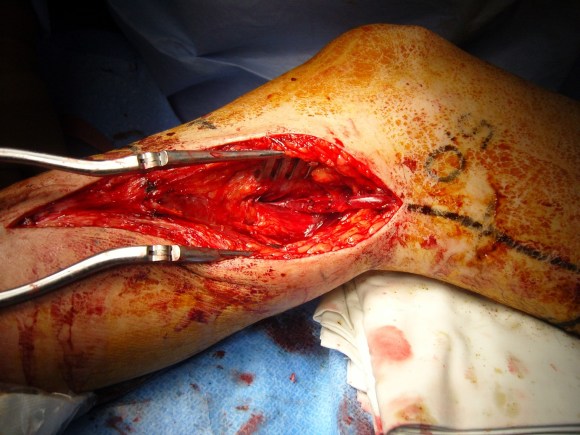
The popliteal artery was opened and endarterectomy of the occlusive plaque was performed. Retrograde remote endarterectomy (EndoRE) with Vollmer rings was performed to the mid superficial femoral artery where on the CTA the calcified plaque ended. The technical point about retrograde EndoRE is that the ring catches as the plaque gets larger more proximally, and has to be swapped out for a larger ring. Ultimately a 7mm Moll Ring Cutter was used to cut the plaque (picture below, arrow to more proximal SFA plaque).

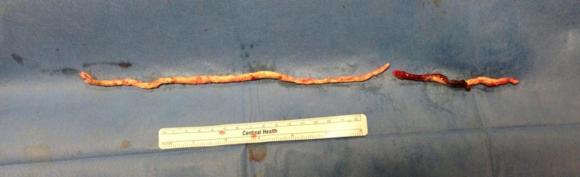
The plaque, because it is larger the more proximal you go, came out with some difficulty via the below knee popliteal artery. This is not a great concern if it won’t come out –you merely have to cut down on the SFA in the thigh to fish out the plaque. In this case, it was not necessary, and it came out in several pieces, facilitated by the cutter which was used to graft the plaque in segments to retrieve it. Unfortunately, I don’t have a picture from this case of the plaque, but I have inserted a popliteal endarterectomy plaque image below from an prior case of popliteal endarterectomy.

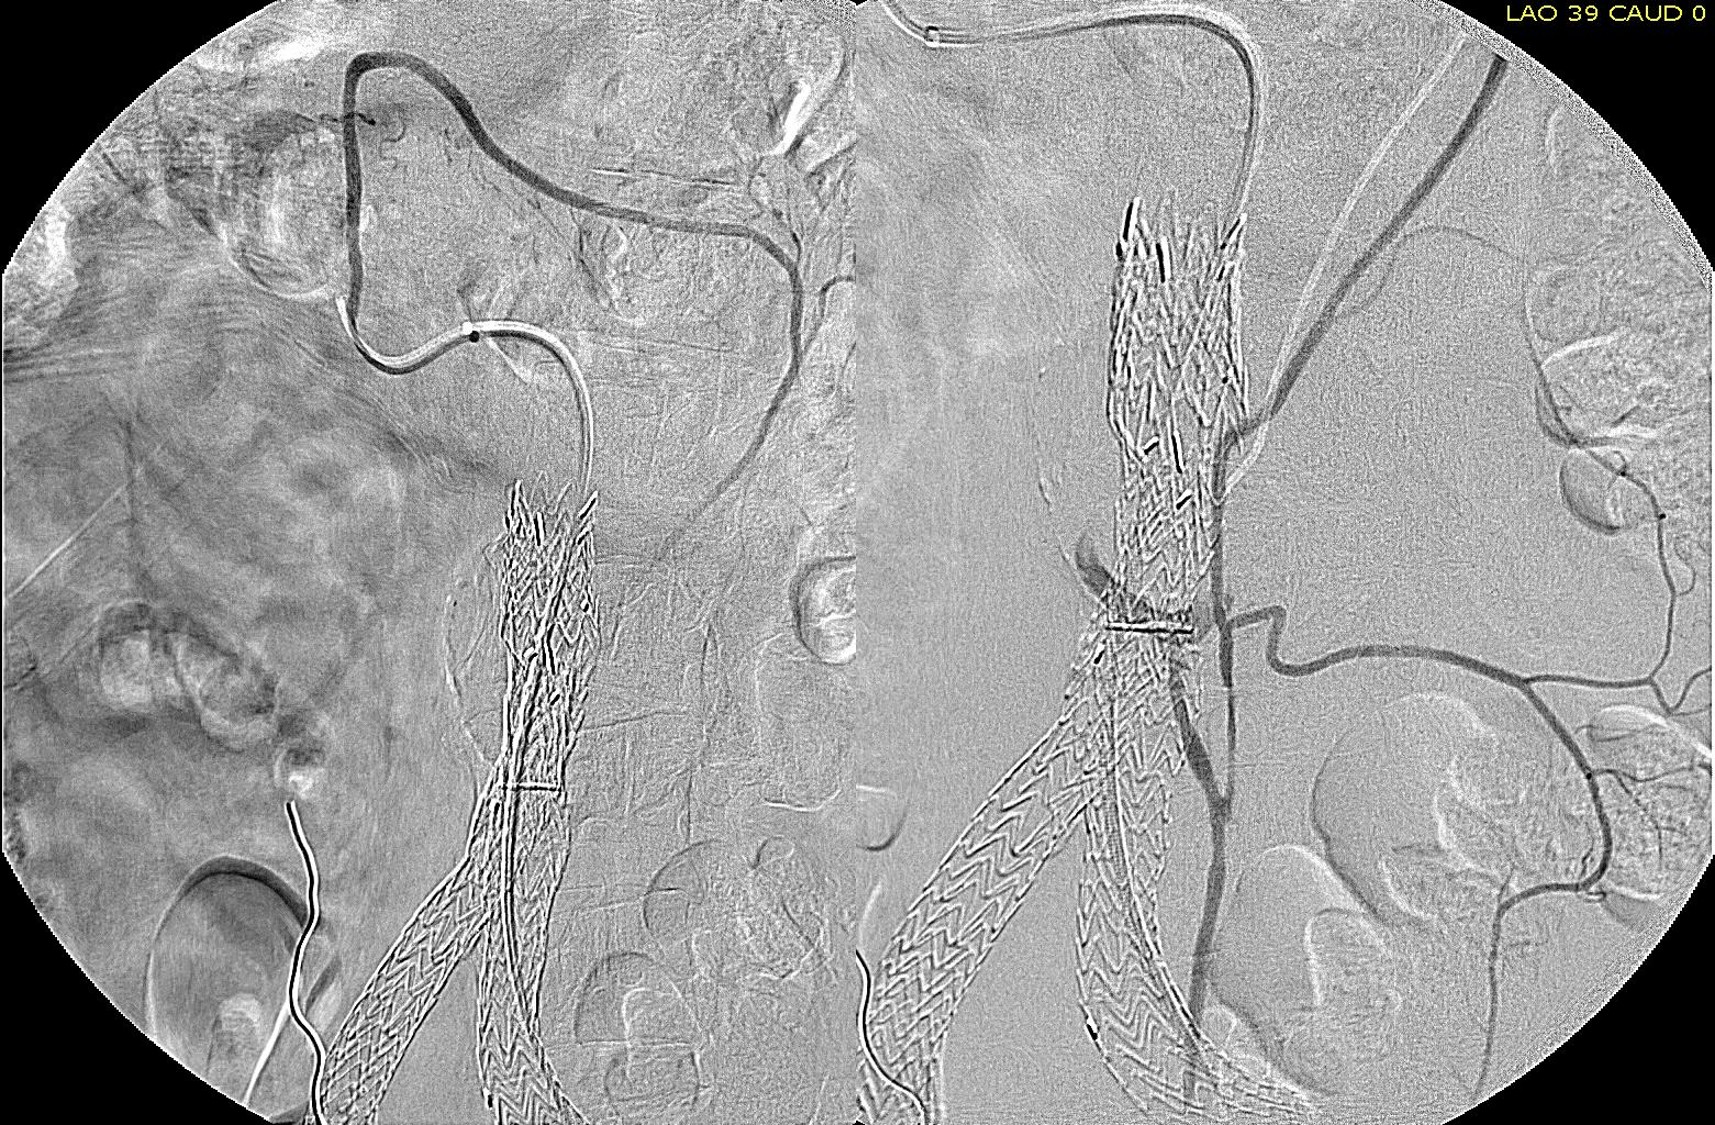
This restored pulsatile flow to the below knee popliteal artery. Opening the artery down to the tibioperoneal artery revealed the artery to occluded and I took the endarterectomy to the peroneal artery origin and everted a short segment of posterior tibial plaque. The peroneal artery was large and would accept flow readily, so I chose to bypass to it using the short segment of saphenous vein that I had harvested for a possible patch or short bypass. The vein was reversed and anastomosed in the usual manner. Arteriograms are below.

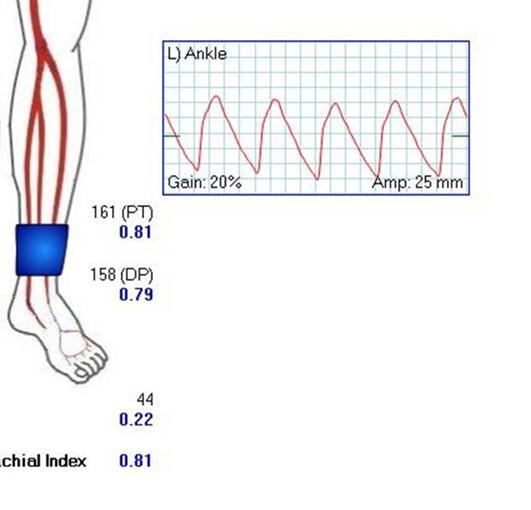
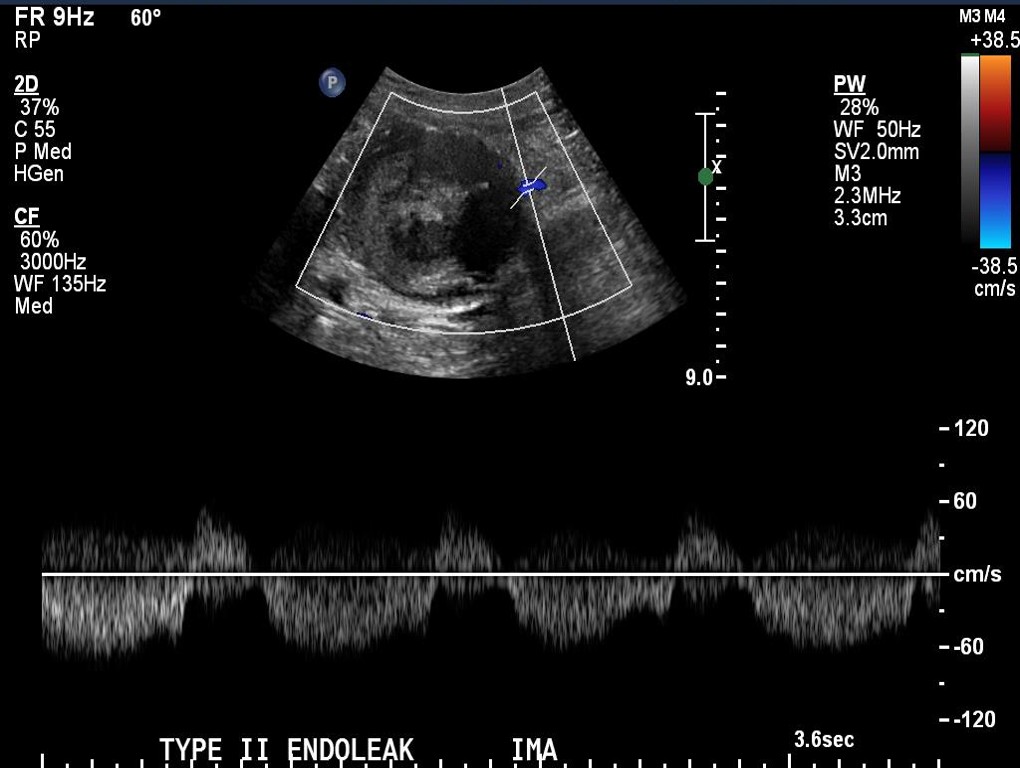
The flows were multiphasic. I attempted to cross the posterior tibial occlusion but ended up with contrast extravasation, therefore stopped with this repair. The patient’s wounds were closed and ulcer cleansed and compressed. In the week postop, she healed her ulcer and her two short incisions, and felt good enough to go home with homecare. Her noninvasive studies and duplex confirmed the patency of her revascularization, and there was a multiphasic signal in her posterior tibial artery as well as peroneal.

In the handful of patients I have managed this way, either with popliteal endarterectomy and patch or short (micro) bypass, they have stayed patent past a year, but do require surveillance. Because of her frailty and unsteadiness of gait, I chose not to anticoagulate with Coumadin which is my usual practice, but have her on Plavix and aspirin.

Categories
AAA techniques

Laparoscopic Ligation of IMA Type II Endoleak

As I had discussed earlier posts, endoleaks can be managed with superselective endovascular access of the AAA sac via the hypogastric artery (Link) or the superior mesenteric artery (Link), but in fact, it may be very easily treated with direct ligation. This patient had a Type II leak causing sac growth from an IMA source and I chose to treat this laparoscopically. The patient was placed in a right lateral decubitus position to use gravity to move the small bowel away from the aorta. An umbilical and left midaxillary line port were placed after pneumoperitoneum was induced. The view above shows the IMA which is readily seen in the retroperitoneum. Ligating it with clips effectively closes the endoleak.


The before and after CT scans show that the endoleak resolves after ligation. This takes about 15-30 minutes of operating.

Categories
AAA CTA EVAR techniques training

Type II endoleak from IMA treated via SMA -concept of building the intervention machine

Picture1

The patient had a successful EVAR or an eccentric infrarenal AAA which in followup grew due to the presence of a type II endoleak from the inferior mesenteric artery. This was seen on the CTA and duplex ultrasound. Planning for assessment and treatment involved analyzing the CTA in centerline, tracking the source of the arterial blood flow into the sac.

Picture2

The centerline from the SMA into the middle colic artery shows a meandering but patent path via the Arc of Riolan to the left colic artery to the inferior mesenteric artery. In my experience this is straightforward to access selectively from the femoral approach, but it illustrates for the trainees the concept of building up access which I refer to as building the intervention machine.

The first step in the access involves getting stable footing in the SMA. Selective access can be performed with a shaped catheter, and once accessed, a Rosen wire is used to track in a curved long sheath. Parking this sheath in the proximal SMA forms the foundation of this machine. The next step is access into the middle colic artery.

Picture3

The CTA is particularly helpful in identifying the middle colic on the 3DVR projection. Selection of this is straightforward with a an angle catheter which I place a Tuohy Borst connector. This is the second stage of the machine, because further access with 0.35guage wires and catheters could result in spasm. This second sheath access (the Tuohy turns the catheter into a sheath) of the middle colic allows for selective 0.18 gauge catheters and wires to make the final step to the IMA and the AAA.

Picture4
Selective access of middle colic artery (left) and later phase showing IMA and endoleak (right)
Picture5
6F Ansel Sheath in SMA, Angled Glide Catheter into Arc of Riolan, 0.18 Glidewire and catheter in IMA
Picture6
NBCA glue used to seal endoleak and IMA

The embolization with NBCA sealed the IMA and the cavity in the AAA sac. This was checked with intraoperative duplex, done with a transabdominal aortic probe.

Picture7
Before embolization

Picture8

Transabdominal aortic duplex is easier on sleeping patient and potentially gives more information than arteriography alone.  The patient in followup had no endoleak and demonstrated sac shrinkage.

The access machine concept is important for planning interventions. Every major branch or turn needs to be crossed by your ultimate access sheath, if you want to avoid having to arduously reaccess those points, and building up a telescoping layer of sheaths is very handy. Every interventional case is done at some distance away from the access point on the skin, and so some though has to be given to how you will build that machine.

With this example, I have shown that you can readily access the AAA sac from the SMA. An earlier article showed iliofemoral access via the hypogastric artery (link). I will give in an upcoming post how this can be done laparoscopically in under 20 minutes.

Categories
Carotid techniques

Hybrid endovascular repair of proximal left common carotid artery aneurysm

image

Patient is a younger man who was referred for evaluation of a left common carotid artery aneurysm that complicated Takayasu’s arteritis. He was on maintenance steroids and was asymptomatic, but over a year of surveillance, his aneurysm grew from 2.6 to 2.8cm with encroachment of the aneurysmal segment onto the origin of the LCCA which had a bovine anatomy. Treatment options included continued observation, open repair -direct or extraanatomic, and hybrid endovascular repair.

image

The patient did not want to undergo sternotomy for definitive repair if less invasive options were available. Considering a subclavian to carotid bypass, the occlusion of the aneurysmal stump would be technically difficult and hazardous for future stroke. Therefore a hybrid repair with exposure of the carotid bifurcation and clamp of the internal carotid artery for cerebral protection was chosen.

image

In the operating room, the carotid bifurcation was exposed via an oblique skin line incision with the C-arm oriented on the patient’s right. A table was draped off the patient’s left arm which had been prepped for brachial access for aortography. Access was taken from the distal common carotid artery with orientation of the Rosen wire down the descending thoracic aorta -this was to accomodate the nose cone of the device, a Cook 24mm AUI converter with a 12mm iliac extension. This choice of stent grafts accorded with the type of graft I would have chosen for the open repair (Dacron based), and had the appropriate size to exclude the aneurysm from the short proximal neck to the distal segment. The arteries were surrounded by inflammatory tissues and this made dissection challenging but not onerous as a redo dissection.

image

The predeployment arteriogram identified fluoroscopic clues to deployment.

image

In this patient’s case, the tip of the ET tube provided an excellent reference. (see above composite arteriogram).

image

Deployment was satisfactory. The arteriotomy, a transverse one I had made to avoid a tear in the thickened, chronically diseased artery, was repaired with running monofilament suture after flushing. The patient did have some oozing because of being on Plavix, but a drain was unnecessary. He awoke neurologically intact and was dimissed on POD#2.

Categories
Carotid techniques

The carotid baroreptor -can it be reconstituted after carotid endarterectomy?

IMG_1094.JPG

While I was a site investigator for the CVRx Rheos Trial, a device that induced hypotension and bradycardia by stimulating the carotid baroreceptor with electrical energy to control resistant hypertension, I noticed that Hering’s nerve can be readily identified by accompanying arteries which show up as paired red lines. The baroreceptor complex is a pressure transducer and the maximum dP/dt can be transduced in areas of maximum curvature change. If you recall those tension maps of aneurysm rupture points, they occur in areas of maximum curvature and inflection points -wouldn’t a baroreceptor be constructed to sense pressure and change in pressure here? Hering’s nerve comes out over these areas. It struck me that most of the patients with carotid disease are hypertensive and it may be a disease cycle that occurs with stiffening of the baroreceptor, decreased parasympathetic tone, and hypertension as the output signal with subsequent vessel injury and plaque formation and worsening stiffness -a non virtuous cycle.

The nerve probably wraps around the origin of the internal carotid artery or wherever the curvature is best suited for pressure transduction. If you visualize the bulbous origin of the ICA as the belly of the guppy, the arteriotomy is made traditionally on the side facing you which is on the side and across at least half of Hering’s nerve -on the lateral surface of the guppy. If you make instead an arteriotomy on the belly of the guppy, and preserve as much of these nerves as possible, it would be theoretically possible to reconstitute a baroreceptor, maybe the dominant one (there is a sidedness to the baroreceptor strength).

There is an intriguing consequence to cutting the nerves -for example in skeletonizing the ICA for an eversion. Eversion endarterectomy done this way is associated with greater incidence of postop hypertension than standard endarterectomy (ref 1,2). The question is if the converse -if reconstituting the baroreceptor can bring decreased need for anti hypertensive medications or even hypotension and bradycardia -is true and if there is potential for applying this as therapy for hypertension as well as stroke risk reduction.

References
1. J Vasc Surg. 2012 Aug;56(2):324-33.
2. J Vasc Surg. 2001 Nov;34(5):839-45.

Categories
techniques

Arteriovenous fistula after ankle infection –workup and treatment

The patient presented with complaint of right leg swelling and pain that became unbearable as the day progressed. He had had a prior bout of septic ankle joint which occurred after treatment of infected hardware in the other ankle. He did have an aspiration of his joint but no major surgery. His local specialist performed arteriography, found an arteriovenous fistula, and referred him after concluding that an endovascular repair was not possible.

On examination, he had dilated leg veins and a boggy, tender leg without chronic venous stasis changes. There was an audible bruit over the ankle where the fistula was identified. It would have been near the puncture site of an aspiration needle. CT scan showed the arteriovenous fistula along with chronic changes on the arterial and venous sides due to the increased flows.

This included relative dilatation of the anterior tibial artery and the outflow veins. One of the animal models of iliac aneurysm involves creating an arteriovenous fistula of the femoral artery at the groin of a rat –this was an arduous operation done under a microscope which was the final exam of a microsurgery course during my fellowship, but I digress. Arteries respond to perturbations of flow by dilatation, elongation (engendering tortuosity), and plaque formation. Two areas of naturally occurring elongation are the internal carotid artery and the external iliac artery –in both cases, it is sometimes necessary to straighten and cut out excess artery. A high number of patients with tortuous internal carotid arteries –those with kinks and loops, have aortic aneursms. In the case of the external iliac artery, this has been used in the past as conduit for infections of the common femoral artery.

He had the clinical triad for an arteriovenous fistula that persists and grows –trauma, inflammation, and good venous outflow. The pain was due to venous hypertension but I suspect some regional compartmental steal and pressure may be at play as well, but that’s hard to prove. It makes me think there may be a way to create AV fistulae for dialysis access using these principles.

The 3DVR imaging was very helpful in planning the operation, particularly the incision and exposure.


Is there an endovascular option? Probably, but why? What are the costs of coils and glues when a few clips and sutures will do? This patient did very well with ligation and division of the fistula. The real magic is our imaging and image processing capabilities.

Categories
techniques

The 10 Minute Renal PTAS

renal stenosis 1

The trick to doing a 10 minute renal PTAS is all in the planning and visualization. Firstly, the CTA with 3D reconstruction (TeraRecon) gives excellent diagnostic images for arteries above 2mm in diameter and therefore obviates the need for additional diagnostic imaging if obtained before the planned intervention. The arteriography for the intervention then is focused on confirming the pathologic findings of the CTA. This patient has had prior lower extremity revascularization and has been troubled by difficult to control hypertension (4 meds) and mild renal insufficiency. Renal duplex found elevated velocities consistent with a >60% stenosis of his right renal artery. CTA revealed this, but also demonstrated a wealth of information regarding his aorta, his aorto-bifemoral graft,  an asymptomatic SMA stenosis. So my initial plan was given his hypertension was to perform a focused renal arteriogram and intervention with minimal time and contrast.

Planning

The first thing I did was go to TeraRecon and plan out access and camera angles. The CTA can show troublesome plaque, tortuosity, or lesions that could spell trouble for access. I decided to access the right hood of his aorto-bifemoral bypass graft above the anastomosis of his fem-pop bypass. Scar tissue, which can be problematic for sheath entry, can aid in excellent hemostasis. The camera angles and location of the renal arteries were determined with TeraRecon. I angled the view to see the right renal artery (above) at a orthogonal plane to my perspective -this turned out to be 20 degrees (see below). renal stenosis 2
Without TeraRecon, this is possible with axial views by creating a clockface and generating an “o’clock” with each hour being about 30 degrees (see above). The origin of the right renal artery is about 9:30 by this scheme. This give me the camera angle to find the renal without shooting an aortogram solely for the purpose of locating the renal artery. We already have an aortogram in the form of a CTA. The 3D reconstruction also informs us that the renal artery comes off at the base of the L2 spinal body at about 15 degrees LAO.

renal stenosis 3
This processed image from TeraRecon shows the skeletal landmarks where the origin of the RRA would be. The LIMA catheter is drawn on.
Access

I performed ultrasound guided access of the right femoral graft limb. Ultrasound allowed me to avoid the fem-pop graft. A micropuncture kit uses a small guage needle which is allows for repuncture. The sheath that comes with this comes with a stiff variant which goes through scar tissue well. I place a 6F sheath and send a wire into the aorta over which I send a 6F LIMA guiding catheter. This is actually a “cardiology style” of access, and the way coronary arteries are accessed. The guide catheters do need to be set up with Touhy-Borst connectors and 3 way stopcocks.

With the camera properly pre-angled, when the LIMA catheter comes in full profile, it should aim the tip at the angle of the takeoff of the renal artery. Using a 0.14 wire (Spartacor) in my case, I start probing with the wire tip at the base of L2 -another important piece of preplanning data. Usually, access to the renal artery is very straightforward at this point. The Spartacor wire has the backbone to support passage of stents and balloons. I use a 145cm length wire, and stents mounted on rapid exchange catheters. Renal arteriography is done through the LIMA catheter with hand injection, and intervention is very straightforward.

renal stenosis 4
The predeployment arteriogram shows the renal orifice to be smaller than the 6F LIMA guide catheter. After stenting, the artery no longer has a stricture at the origin.
The rapid exchange systems allow for quick catheter exchanges. Wires and catheters are removed. Total procedure times 10-15 minutes, and total contrast volume 10-20mL of contrast. This camera prepositioning, catheter profiling, spinal body aiming technique also works well in EVAR if you don’t have the 3D mapping package. Extra arteriography in localizing the renal orifices can often be avoided.
Categories
PAD techniques

Completion Angiography –is it necessary?

Completion angiography fits into the range of things that many of us were taught to do because it might help avoid the problem of early graft failure. I remember a time in the nineties when vascular surgery was synonymous with terrifyingly long bypass operations that sometimes worked. Back in that preinternet era, all day bypass operations were capped at the end with a flat plate arteriogram. As with all things archaic and historic, I firmly believe that our trainees should feel comfortable with this type of on-table arteriography because not every place will have a corridor of rooms with robotic c-arms. I feel that each trainee should feel comfortable wheeling in a portable c-arm, assembling it, turning it on, put in patient information, and perform a study. But I digress. The completion arteriogram clearly has a role in bypass surgery, but I question its usage as a “I do it all the time” routine. When anything is written in stone, it immediately takes on a hallowed, sanctified aura, usually taken on during M&M’s when the person at the podium intones beatifically looking skyward, “the completion arteriogram showed no abnormalities.” Science is about questioning the status quo and backing up practice with evidence.

The purpose of the arteriogram is to evaluate the anatomy for treatable lesions. Screening for these lesions can be just as easily performed with handheld pulse Doppler and if needed, duplex ultrasound. In my experience, the triad of pink toes, palpable pedal pulses, and multiphasic signals in the distal anastomosis is more than enough evidence to start drying up and closing. In this particular case shown in the picture above, the anastomosis looked pristine, but the signals were weak and monophasic in the distal anastomosis despite palpable pulses. Arteriography reveals the reason below, but frankly, the arteriogram was dispensible even in this case (trainees –reason why?). In fact, arteriography takes care of the surgeon more than it does the patient. Tan et al [J Vasc Surg 2014;60:678-85] for the Vascular Study Group of New England, including my friend Dr. Alik Farber, reviewed the VSGNE database and found that a strategy of compulsive completion studies which included angiography or duplex ultrasonography, did not improve short term or 1 year graft patency.

Categories
CTA imaging PAD techniques training

Intuition Aquarius (TeraRecon) Trick -Applying Virtual Reality to Operative Planning

I have used many different flavors of image post processing software including Osiris, Vitrea, and now Aquarius, aka TeraRecon. But I notice that outside of endovascular planning, people rarely use the virtual 3D reconstructed images (the pretty pictures) for anything other than posting images for publication in JVS, and even there I think we have reached saturation.

I have found 3D reconstruction to be especially useful for open surgical planning, and that is by doing two things. First, on viewing the 3DVR data, I reorient and center on the surgeon’s perspective, using left button to rotate the picture around the zero at the center of the screen, and the right mouse button to grab the whole image and recenter as necessary.

Window Leveling.001
Surgeon’s eye OR view

I then window-level in tissue density -this is done by pressing both the right and left mouse buttons, but you can choose this off the menu.

Window Leveling.002

I can plan the incisions and exposures from any angle -in this case, I can see the saphenous vein and its relative proximity to the CFA to perform an in site bypass to the AK POP. And I see the loci of the tributaries that I may need to ligate.

Window Leveling.004

This is a powerful tool that is often overlooked.

Categories
AAA EVAR techniques TEVAR

Percutaneous EVAR and TEVAR -how to get there if you aren’t doing it right now.

24F Access pEVAR
22 French Percutaneous Access circa 2008

Percutaneous access for EVAR and TEVAR does several things. First, the procedure becomes shorter by an hour or two, and (don’t discount not having nursing count instruments because the case was percutaneous). Second, the patients experience far less discomfort and it is easier to discharge them the next day when they have a bandaid versus an incision. And this leads to the third thing: not having an incision means it is far less likely that a groin infection will occur, especially in the obese.

There are three things which you must do before undertaking pEVAR. First, you have to become comfortable with using the Perclose S device in 6F-8F access -about 5 to 10 successful closures will do. You should become facile with the deployment of the sutures and closure of the access point. Avoid small arteries or heavily calcified arteries. This leads to the second point -all of your groin access should be ultrasound guided -this has been shown to improve results in pEVAR (Ref 1). I am a firm believer that the source of groin access complications starts with the initial needle stick. The 18g needle is basically a short 11 blade rolled up into a cylinder, and during groin access without ultrasound imaging, one can shear branch arteries, skewer arteries, dissect plaque, and access too proximally or distally, or into the profunda femoris.

needle is scalpel

The third need is access to 3D reconstruction software and multislice CTA. This gives you powerful ability to predict which patients are more suitable for a percutaneous approach, and which should have a cut down, and with 3D virtual reality reconstructions, you can plan where the incisions will be. In the skinny patient, this is not a pressing issue, but in the merely obese and the frankly obese, and the super obese, choosing to go percutaneous and avoiding a groin complication, which may be the one thing that debilitates the patient far more than a stent graft deployment, becomes an easy decision with experience.

As you build your 6-8F Perclose experience, you may notice that having too tight and subcutaneous tract can result in the suture catching on SQ fat, and not closing, or that bleeding won’t surface properly and create a hematoma under Scarpa’s fascia, often after the patient gets to the recovery room. Expanding on this principle, as you leap to 12F access and preclosure, I recommend you try this -make a 10mm incision, and using a tonsil clamp, pop through Scarpa’s fascia and seat the tips of the clamp under ultrasound on top of the soft part of the CFA that you intend to access. Gently spreading creates the space that you need to deploy the sutures and ensure that any bleeding will exit the skin and not dive under the fascia. It amounts to an ultrasound guided dissection of the common femoral artery. Before you remove the tonsil, you gently maneuver a micropuncture (always) access needle between the tines of the tonsil clamp until it gets to the artery -this keeps the eventual wire going through the tunnel you just made.

12F can usually close with a single Perclose, but start practicing by placing two Perclose sutures in a 10 oclock and 2 oclock orientation. Once the sutures are in, I make sure the  two ends of the suture are pulled out and the end loop of the suture is on the artery and I clamp these sutures to the drapes medially and laterally depending on how I deploy the two sutures. This also helps avoid catching the suture and driving it into the aorta.

After performing EVAR or TEVAR, I remove the sheath, leaving a wire -typically the stiff wire originally supporting the sheath and deploy one of the sutures. This first suture should cinch down onto the artery and substantially decrease the bleeding coming from the access site. I then deploy the second suture, and if the bleeding has stopped or is a steady dribble, I remove the wire. If pulsatile bleeding persists, I recinch the sutures using the knot pushers. If this decreases flow, I remove the wire, otherwise, I place a dilator, stop the bleeding and cut down. Cutting down after SQ dissection means merely dividing skin and tissues over the dilator, and the artery is easily visible for suture placement. If I remove the wire and there is still some bleeding, and usually there is, I place Gel-Foam soaked in diluted thrombin into the tract, reverse heparin, and hold pressure for 10-20minutes. It is very rare to have to convert after this is done.

thrombin gelfoam
thrombin-gelfoam into tract

The skin is closed with an absorbable 4-0 monofilament suture, and skin glue. I usually use the micropuncture needle to give an ilioinguinal field block with Marcaine. This gives 24hrs of pain relief.

bandaids

A note about incisions. Usually, with 3D VR imaging of CTA, the CFA and its quality (size and absence of plaque), and location relative to the inguinal crease can be ascertained. I try to make the access point at the inguinal crease or distally, as this goes under the subpannus of groin fat rather than through it.

groinaccess
3D-VR imaging can pinpoint optimal access

I sincerely believe sheath size is not the limiting factor to percutaneous access. Rather, it is the common femoral and iliac artery. Zakko et al at the University of Florida just published their experience on the obese with percutaneous TEVAR (ref 2), and found that while the arteries were deeper, the technical success rate of staying percutaneous (over 90%) was no different between their obese patients non-obese patients. The predictors of failure were poor access artery quality and size. I believe that you can select for patients most likely to succeed and greatly reduce failure. In this population, groin complications are potentially life threatening, and avoiding an open groin exposure is valuable.


References

1. J Vasc Surg 2012;55:1554-61 (ultrasound guided access)

2. J Vasc Surg 2014;60:921-928 (p-TEVAR and obesity)